Task 3 – Problem Solving
Task 3.1
- Level design maps (floor plans, elevations, topographic).
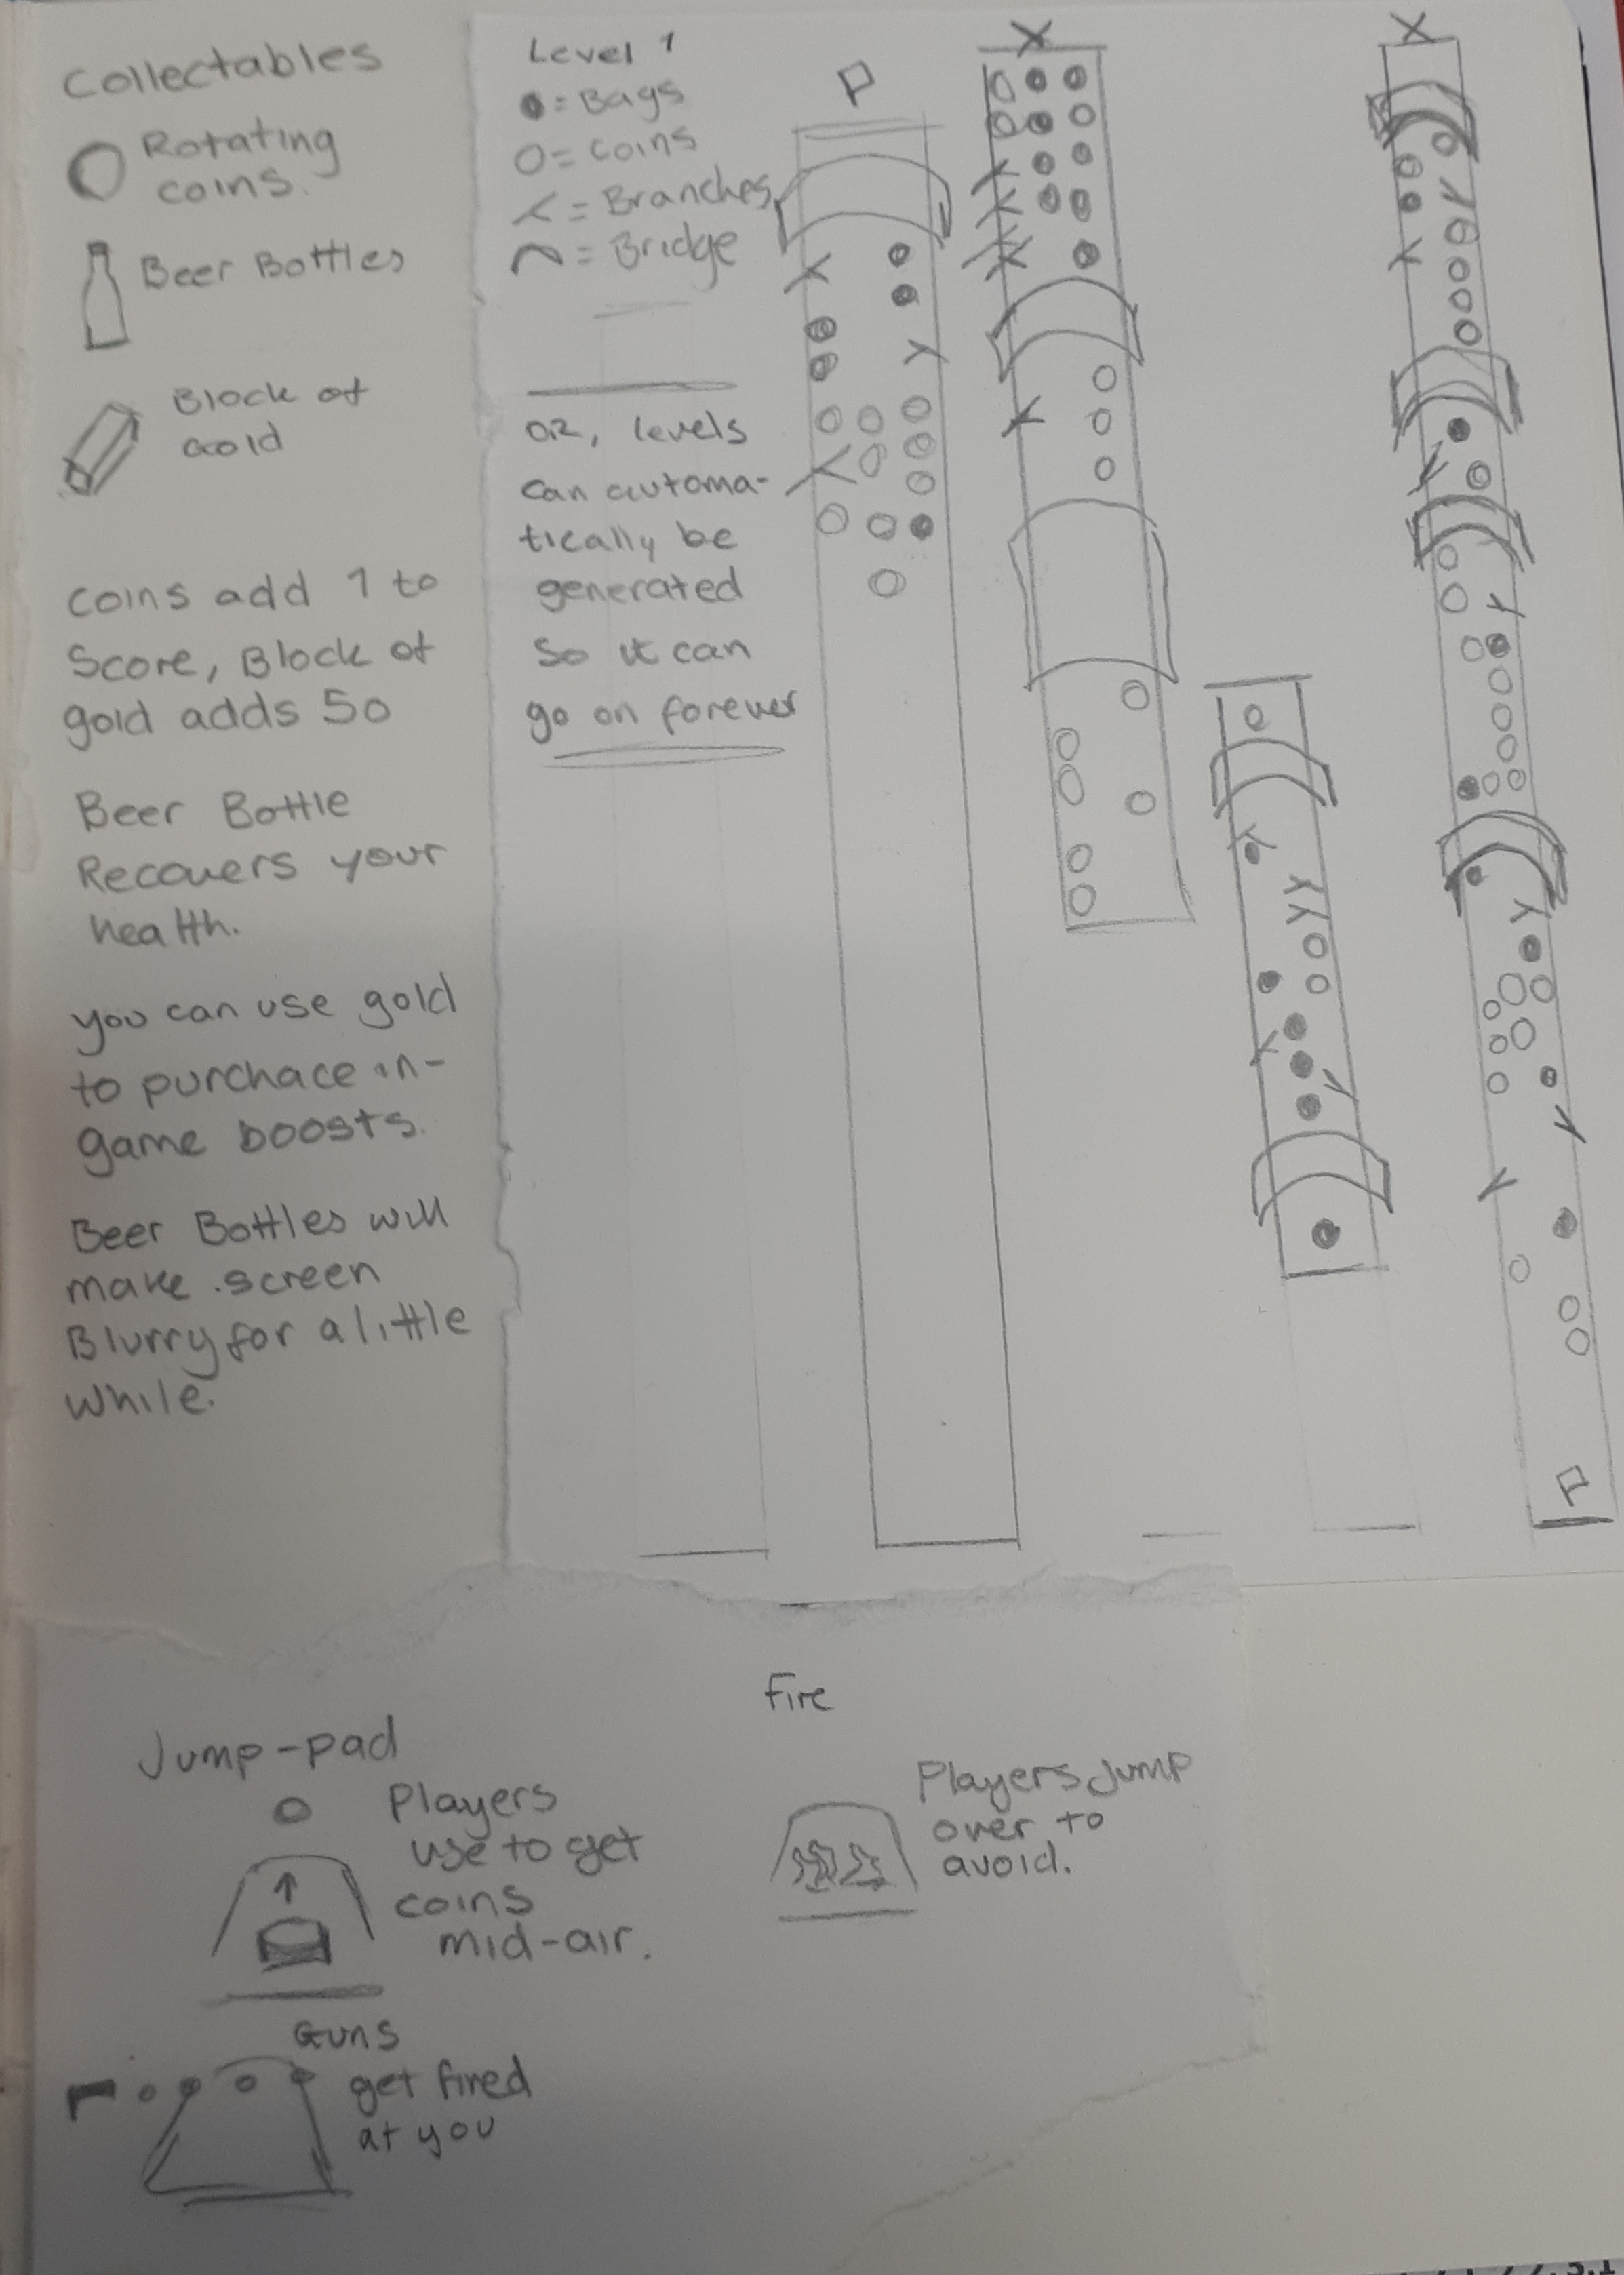
This is my level planning, at first I drew out a level which could be level 1, you can jump from train to train and there would be an ending point, but then I done some research on endless runners, and I decided that my idea was silly with a planned out level and I should just randomly generate it instead so it can go on forever, with no end, and that’s where the title of an ‘endless’ runner comes in.
So instead of level planning, I decided I would think more about how I’m going to have everything laid out.
I’m going to have the player run forward, and the camera behind the player, I was going to have it zoomed out enough that you can see the obstacles in front of you but not zoomed out enough to see too far ahead so you can’t plan ahead.
I was playing around with the camera in Unreal Engine to find the values which I think would work the best.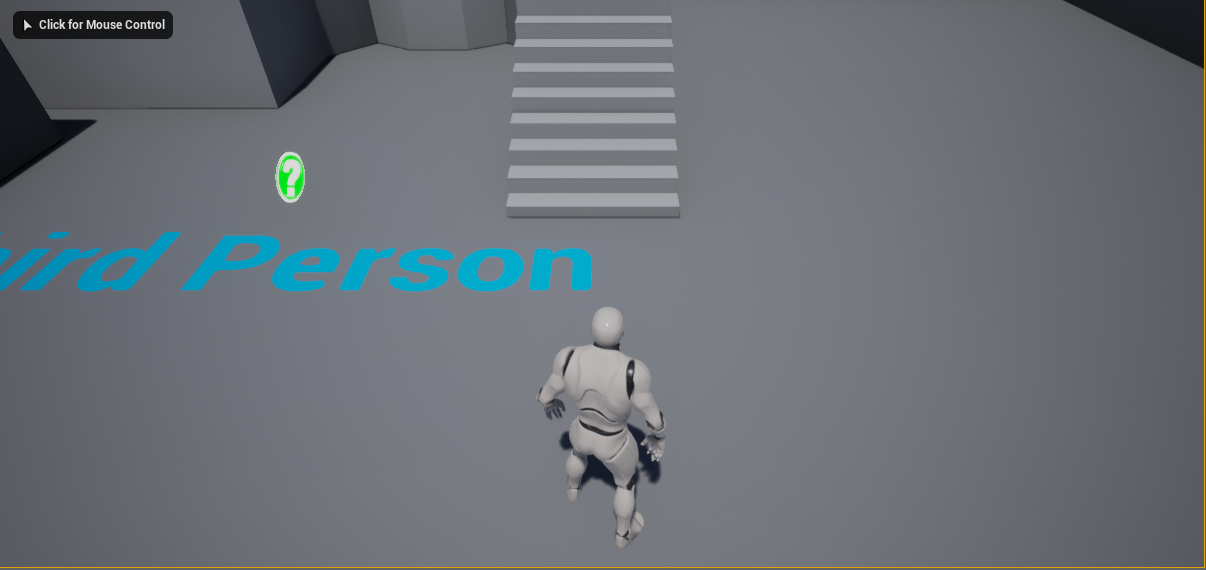
This is my first idea for a camera position that I’d like, it’s just above the players head and you can see clearly in front of you, one thing which I think is really annoying is the fact that I’m developing this game on PC so the screen is going to be widescreen, and most endless runners are vertical, not horizontal.
I then set the camera mode onto Orthographic, and I really liked the results.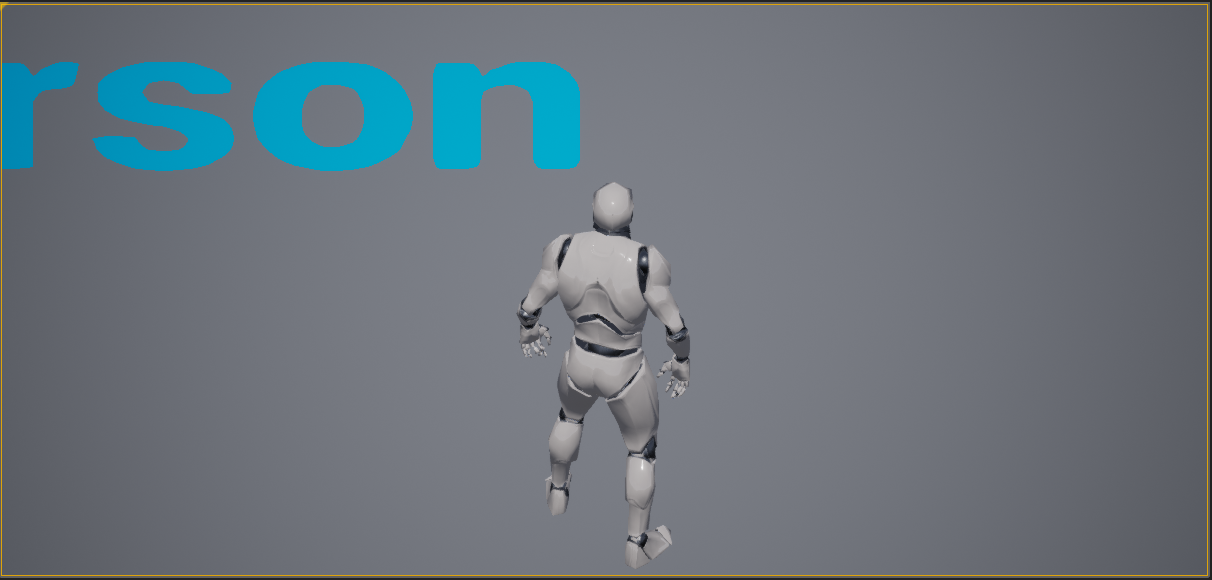
I felt like with the current settings this was too zoomed in, so, I pulled the camera back a bit.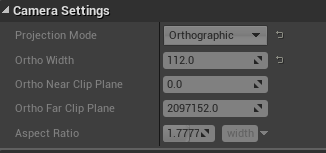
This didn’t help so much, which left me in confusion, so I looked more into the camera settings and realized I just needed to adjust the camera settings.
After playing around with these, I found the perfect camera settings which I really like, and it gave me this result.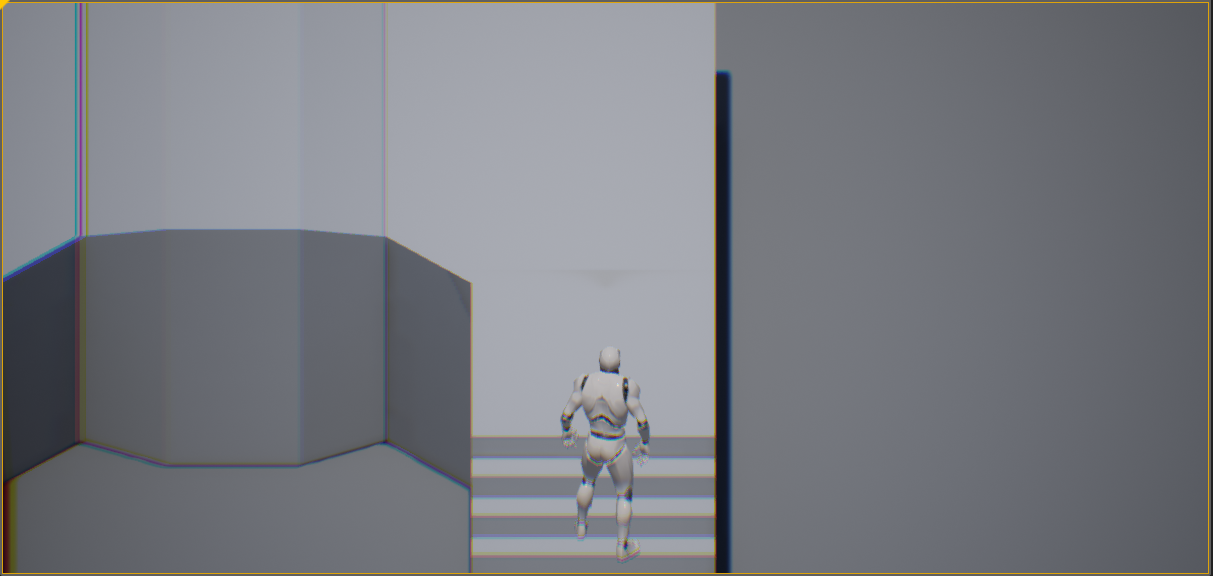
 Here are the final camera settings which I’m going to use.
I personally feel like these settings are perfect for an endless runner since the bottom of the camera is just at the players feet, and you can see in font of yourself pretty well so it’s possible to avoid obstacles.

In my art class, we learnt about drawing roughly over 3D objects to achieve perfect perspective, this would really help if I had some landscape plans for my own game, but unfortunately, since my games levels are randomly generated, there isn’t much planning I can do for the landscape, the only planning I can do would be the UI and how I want the screen laid out, where I roughly want the train to be and what the background is going to look like.
- Asset choices (compare asset choices from free libraries or sketch/photobash own assets).
Background (Skybox, parallax background)
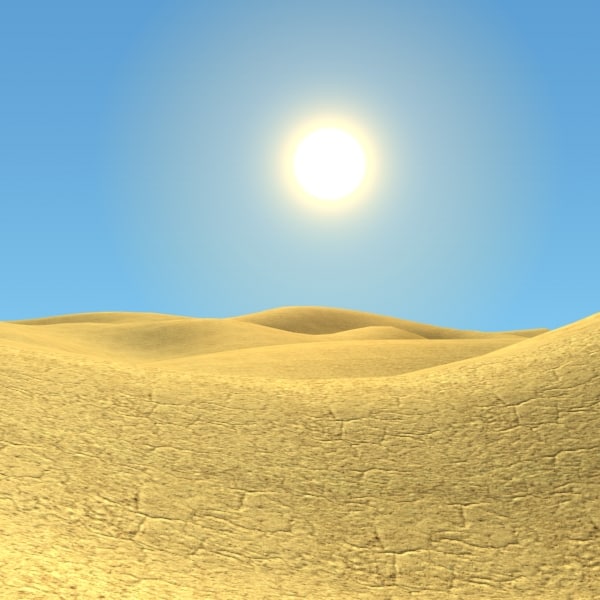
I was looking around for a good background for my project, and I found a few which I like the look of. Firstly, we have a Parallax Desert Background (2017) by Cryptogene on gamedevmarket.net.
This is a Parallax background which could work in my game, but then again, I’m really not too sure since it is a 2.5D game which has the camera behind and above the players head, there wouldn’t be much view from the background, but the asset does look amazing, and it fits in with the low poly style which I want to go for.
Why I like it – How it does fit with the theme/game: Overall, I really like the style of this parallax background, it’s colour is bright and really makes you think of deserts and western right away due to the use of saturated oranges and yellows and purples, these tones are very warm, and that is what a desert is, boiling hot, so it really sets the atmosphere, I also really like the use of the big sunrise and the morning sky beginning to peak over the horizon.
It fits the theme since our theme is western, and western is set usually in deserts and deserted cities and areas.
Why I don’t like it – How does it not fit with the theme/game: The use of many canyons and cactuses makes the background not feel that lonely and deserted, which isn’t really what we are going for. We are looking for a vast open desert land, which this is most definitely not. It is also 2D, which would be very hard to include in my game since my game is 3D, so it might end out looking weird if I were to use this.
—–
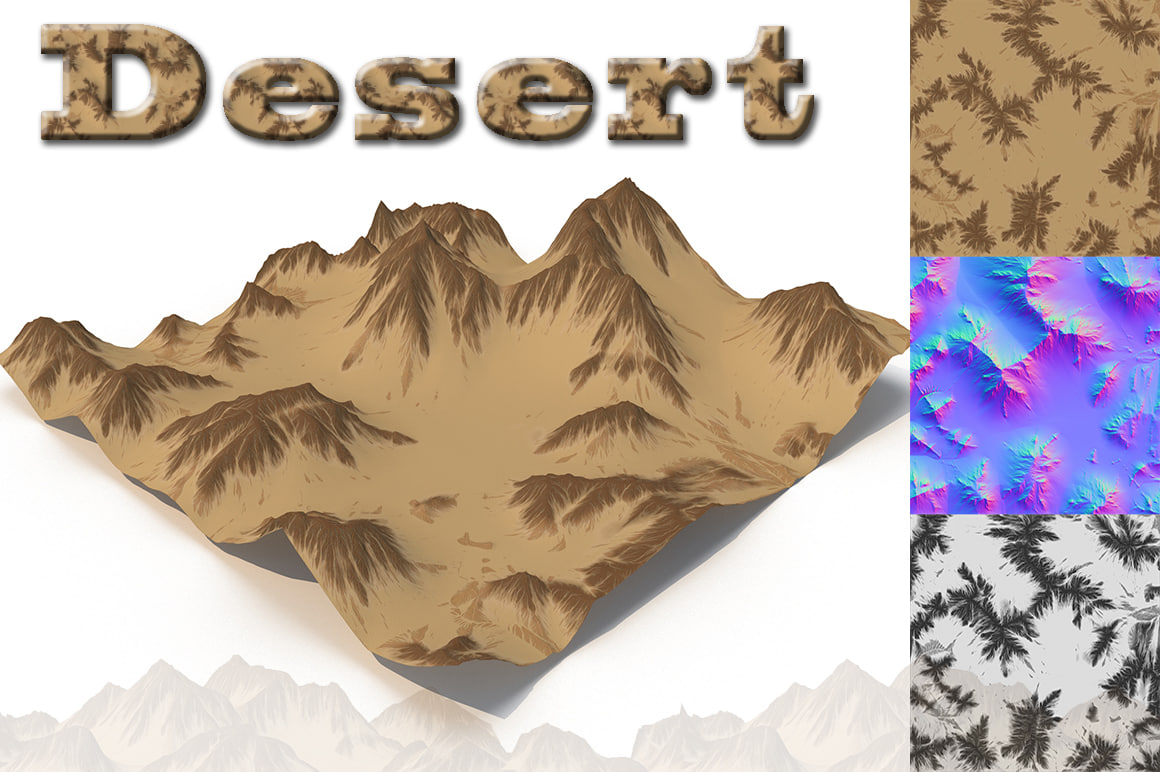 Next we have Desert (2016) by AndrewBelyi on turbosquid.com.
This is a texture which is applied to a plane to give the bumps and hills on the ground.
I’m not a big fan of this one since I think i looks far too harsh, and not realistic, the texture as well is lacking since it doesn’t look realistic at all, but it does fit in with the style which I want to go for.
Why I like it – How it does fit with the theme/game: I like this because it looks like a fun area to explore in due to the high hills, this could make fun gameplay with the player running up the hills on the trains and rails, I also like how all the maps are included in this image so you can edit the bumps and how harsh they are. It does fit with the theme western, since it is a desert and many deserts tend to have hills of sand.
Why I don’t like it – How does it not fit with the theme/game: I don’t like this since I feel like the hills are too sharp, usually sand hills are smoothed out and another reason I don’t like this is because the texture on the sand doesn’t look that realistic, it doesn’t fit with my game since the player would only be running straight ahead, not up hills, the player would also see the texture on the ground, and this texture looks very plain, so it wouldn’t look that great in the game.
—– Next we have Arab Desert (2009) by choly kurd. I like this one since it is basic and not exaggerated at all, it would be perfect to use for my game.
The textures are lacking slightly, but since the player isn’t going to be focusing on the ground whilst playing the game, I think it’s fine.
It fits in well with the low poly theme which I was going for for my game.
Why I like it – How it does fit with the theme/game: I like the textures on the ground of this desert, and I also like the hills and bumps on the ground, this is a lot more of a realistic terrain then the previous desert, it really shows a desolate vast desert which is exactly what I’m going for, it fits the theme of western and it would be perfect for my game since it’s not too bumpy but not too flat either.
Why I don’t like it – How does it not fit with the theme/game: I don’t like the colour of the sand since it looks quite unrealistic with how bright it is, this makes it look cartoony, which is somewhat what I’m trying to go for, but I don’t think this colour would work well, but I can change this.
It doesn’t fit with the theme since I would imagine western deserts to be more orange and it wouldn’t fit with the game since the bumps may get in the way.
—– Next, we have Desert Landscape (2016) by lacomap. I think this one is perfect for my game since there is plenty of flat land for the train to run through, but, that’s a negative as well since there is too much flat land and I feel like there needs to be more variance, since the player will only see the sides of the landscape, it’s also not as cartoon and low-poly style as I want it to be, it looks more on the realistic style (Minusing the fact that the whole ground is flat which isn’t realistic at all)
Why I like it – How it does fit with the theme/game: I like it because it would be easy to work with, considering the ground is flat and there is a lot of props everywhere which will make the background look random and full of different things which is what you usually see in a desert, it fits in with the theme since I would imagine a western city would be built here since it’s a vast flat deserted land.
Why I don’t like it – How does it not fit with the theme/game: I don’t like it because of how flat and unrealistic it is, a desert isn’t usually this flat, and the land seems to have been placed out randomly which is inconsistant and doesn’t look too pleasing, another reason I don’t like this is because there is no sand material on the ground.
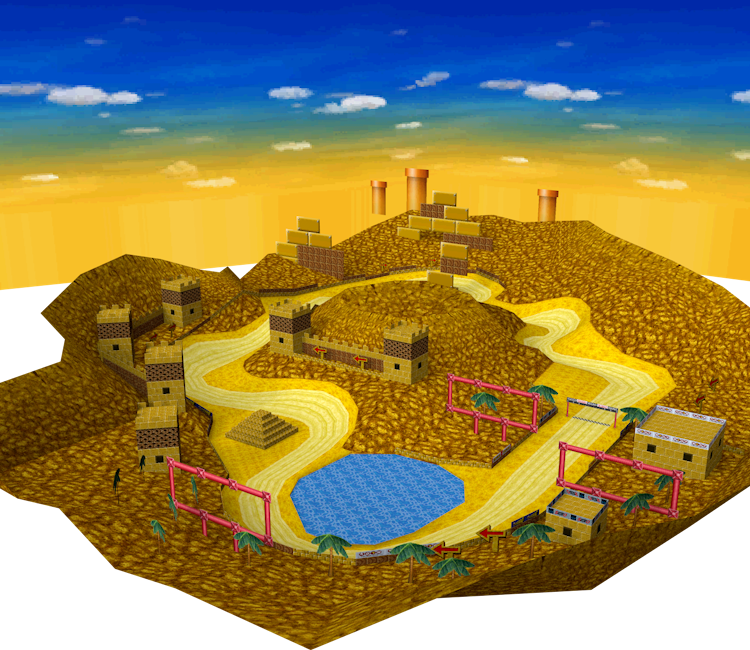
—– Next we have a Desert (2014) by Alex38. Although the trees and pond and fish in this desert aren’t something I’d like to include on my project, I think the landscape is perfect, it’s not too bumpy and it’s not too flat either, it looks amazing for what I need, and it also looks low poly, which fits in with the style and the audience which I am going for.
Why I like it – How it does fit with the theme/game: I like this because it has realistic looking terrain, with bumps, not too many but not too little, this is usually what you’d find in a desert environment.
It fits with my game since the ground isn’t too bumpy so it would be easy to work with, and another reason is because it would work well with the style and audience I’m going for, a low poly game which will fit the audience of males around 7 years old.
Why I don’t like it – How does it not fit with the theme/game: I do feel like the sand colour is quite bright, and I would definitely get rid of the trees water and fish since they don’t really look nice, they look like they’re suited for a much younger audience, and the only thing in here which I really like is the landscape. It doesn’t fit the game somewhat as I feel like the sand could have much more detail in it, and not just a plain colour.
—– Here’s a Landscape (2011) by bourloten. I like this since it’s not fully a desert, it’s land which I would expect to see in a western town, and I can easily insert rail tracks and a train through this.
This doesn’t really fit my low-poly plan that I was going for to fit with my audience though, since the textures are more on the realistic side and not on the cartoon side like low poly games are.
Why I like it – How it does fit with the theme/game: I like it because the texture on the ground looks just about the right detail I would like on my game and the mountains in the background look very nice to have in the back of my game, going across in a parallax fashion, framing my scene.
It would fit well with my game since I need flat land for the train to go across.
Why I don’t like it – How does it not fit with the theme/game: I don’t like how the land is very flat, similar to the Desert Landscape (2016) by lacomap from beforehand, it’s too flat to look realistic. It wouldn’t really make the player feel like they’re going through a deserted land and the game would have a sense of ‘Unfinished’ to it.
—–
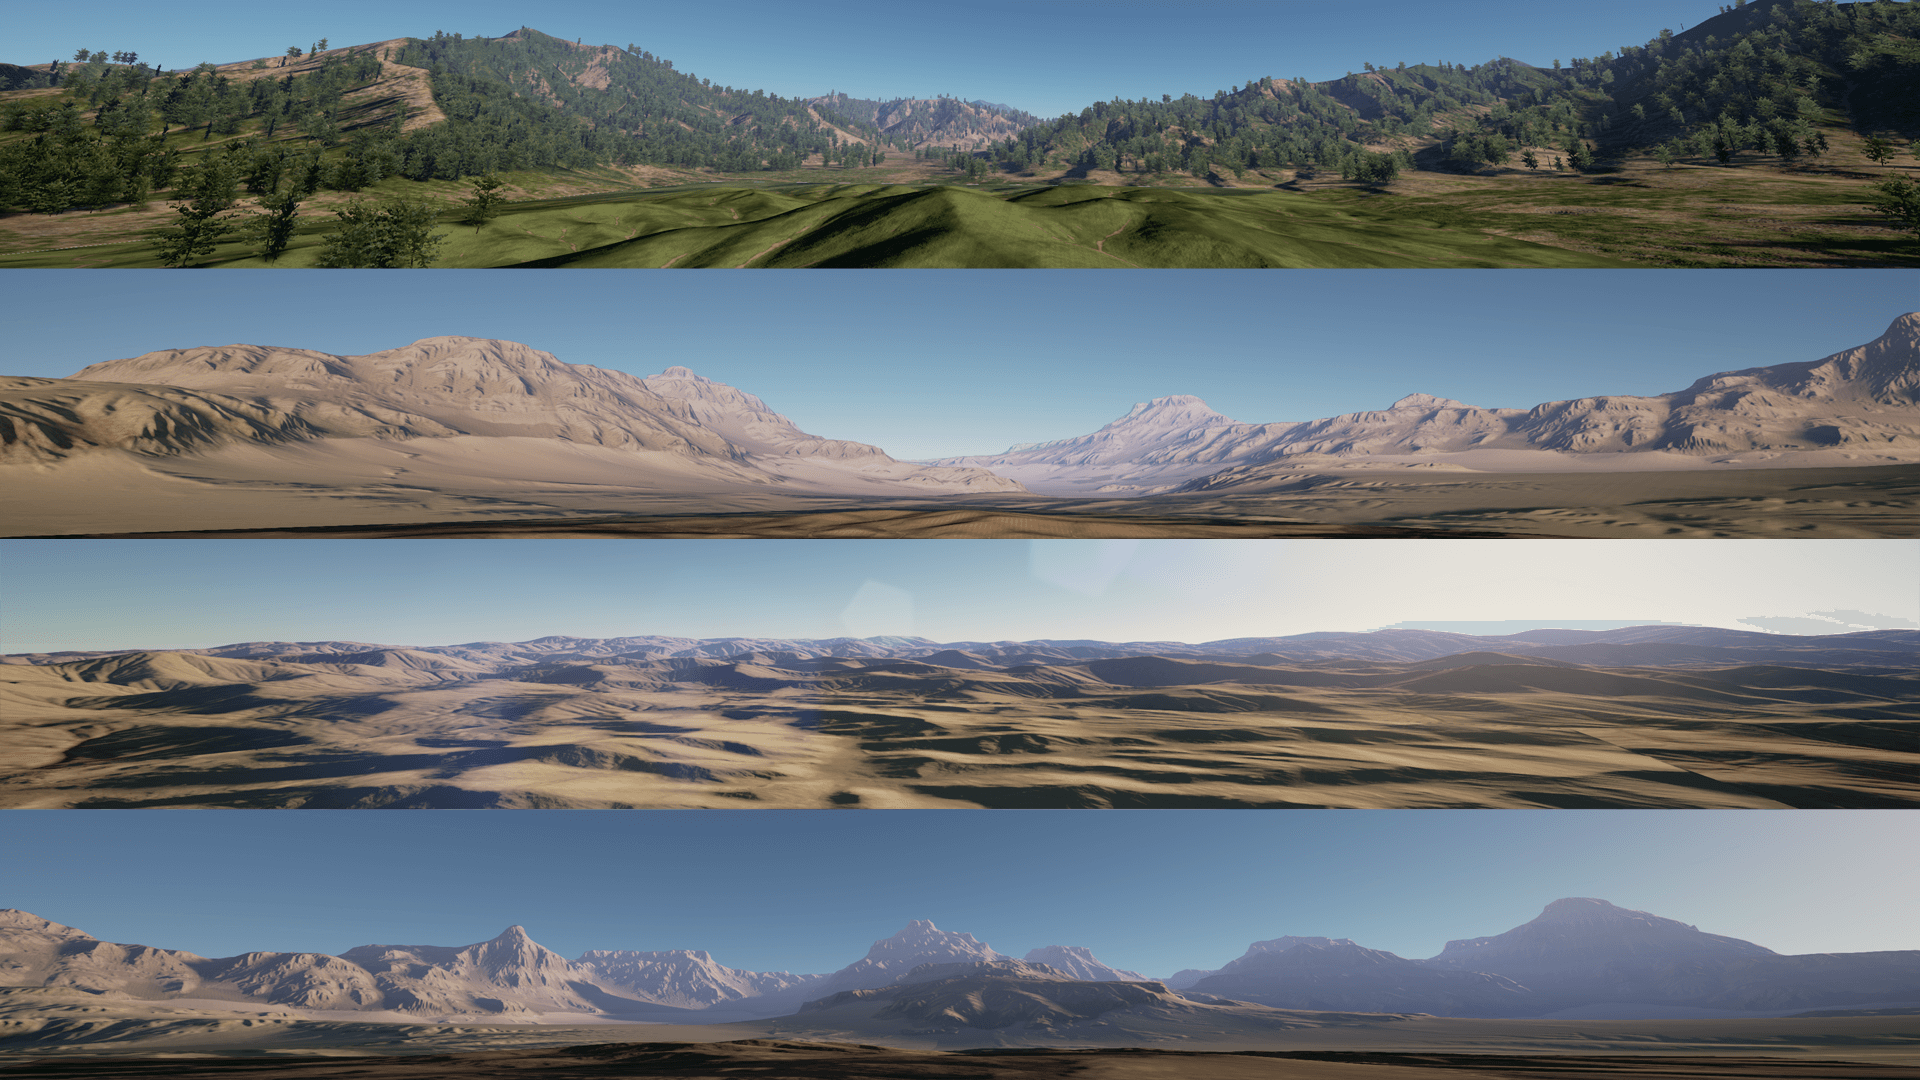
This is Landscape Backgrounds (2016) by Gokhan Karadayi. They’re just what I need.
But I don’t think the player would be able to see them because of the position of the camera.
One con about this is the fact that it’s realistic, it looks really nice but it wouldn’t match with the low poly style which I want to go for in the game.
Why I like it – How it does fit with the theme/game: I like this one a lot since it is very realistic, the sand is textured perfectly to look like real sand, and it has the perfect amount of bumps in it to not be too distracting to the player and the game. It fits with the theme since the sand feels huge, and I can easily loop the background seamlessly and not many people would notice the infinite land. I also like it since the materials are easy to adjust to fit what colours and harshness I need.
Why I don’t like it – How does it not fit with the theme/game: I don’t like how realistic this is in a way, since it wouldn’t fit with my target audience and style of the game, but this can easily be changed if I change the material properties.
—–

I absolutely love this Polygon Desert Pack Free low-poly 3D model (2018) by runemarkstudio. It’s got everything I need in it so I think I’m going to end up using this since it looks really nice, and it perfectly fits in with the low poly style which I want to achieve with my game.
Why I like it – How it does fit with the theme/game: I like this since it is low poly and looks like this pack has a lot in it which I can use in my game, these would be perfect to scatter randomly throughout my desert environment to give the player something nice to look at in the background, if I were to adjust the background to have a bright saturated colour, I feel like these low poly models could work perfectly in the background of my game, it also fits the theme since seeing this image reminds me of the types of plants you would see around a western town environment.
Why I don’t like it – How does it not fit with the theme/game: I don’t like how the rocks in this image don’t fit the same colour as the desert ground below them, but in a way, you do see different shaded rocks in a desert, but I don’t like how the sand below the rocks is the lighter colour, that is probably something I would personally change to fit my game. It fits my target audience very well since it is bright and saturated, and almost looks like it belongs in a cartoon, which is somewhat what I’m trying to go for.
—–
Collectibles, Pick ups
 This is a beer bottle – Oz Beer Bottle V2 (2018) by printable_models whenever I think of Western – I think of Cowboys, and whenever I think of cowboys, I think of beer, so I think this would be a perfect thing for a western character to collect, I can imagine a small beer bottle spinning around in circles on top of a train.
Why I like it – How it does fit with the theme/game: I like this because is isn’t too detailed and it’s clear to see that its a beer bottle from afar, it fits with the theme since in western america, there is a lot of saloons, and saloons have alcohol in them, so this is something a western person would want to drink, so I feel like it would be a good collectible. It fits with my game since my game is an endless runner, and this bottle of beer could be something which gives the player an advantage for a little while, or even a disadvantage.
Why I don’t like it – How does it not fit with the theme/game: I don’t like the colour of the bottle, I would personally change this to a brown with more of a red tone in it, I do think in a western american saloon, the beers would be served in glasses instead of straight out of the glass bottle.
—– This Coin (2014) by moddlestudios I feel would be perfect for a western-style game.
This is because, firstly, the date on it is accurate to when there was a Western America. And Western Americans would be chasing after money since they didn’t have a lot back then. –
Why I like it – How it does fit with the theme/game: I like this coin since it is simple and you can clearly tell it is a coin, it fits with the theme since the Wild West era is set around the date which is on the coin, so it makes perfect sense to have this gold coin be a collectible in the game.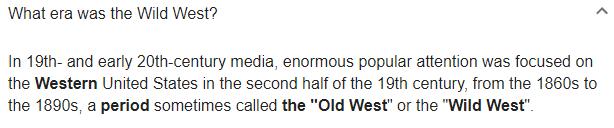
Why I don’t like it – How does it not fit with the theme/game: I don’t like how the side of the coin looks like a hay stack, but the coins wouldn’t be huge in the game so it probably won’t be seen, I also don’t like how ‘realistic’ it is, it’s not too realistic but the style of the coin isn’t what I am going for, I feel like it would be better if I use a low poly coin which looks more obvious that it’s a coin in a low poly cartoon game which is aimed at children.
—–
And that’s the same for this 3D model below as well! Bag of gold (2018) by printable_models

Why I like it – How it does fit with the theme/game: I like it since I feel like it would be a good collectible considering it’s a bag of gold, it would be rare for it to spawn, but when it does, it gives you lots of money, it fits with the theme considering people in the western times would put all their gold in bags, so this fits with the theme and time period.
Why I don’t like it – How does it not fit with the theme/game: I don’t like the textures of this bag of gold at all, the gold at the top doesn’t look too nice and the leather material on the bag looks low quality, if I were to use this model in my game, it would have to be a small bag of gold and I would need to adjust the materials and textures to be more of a brighter brown which draws the players eye.
—–
Obstacles
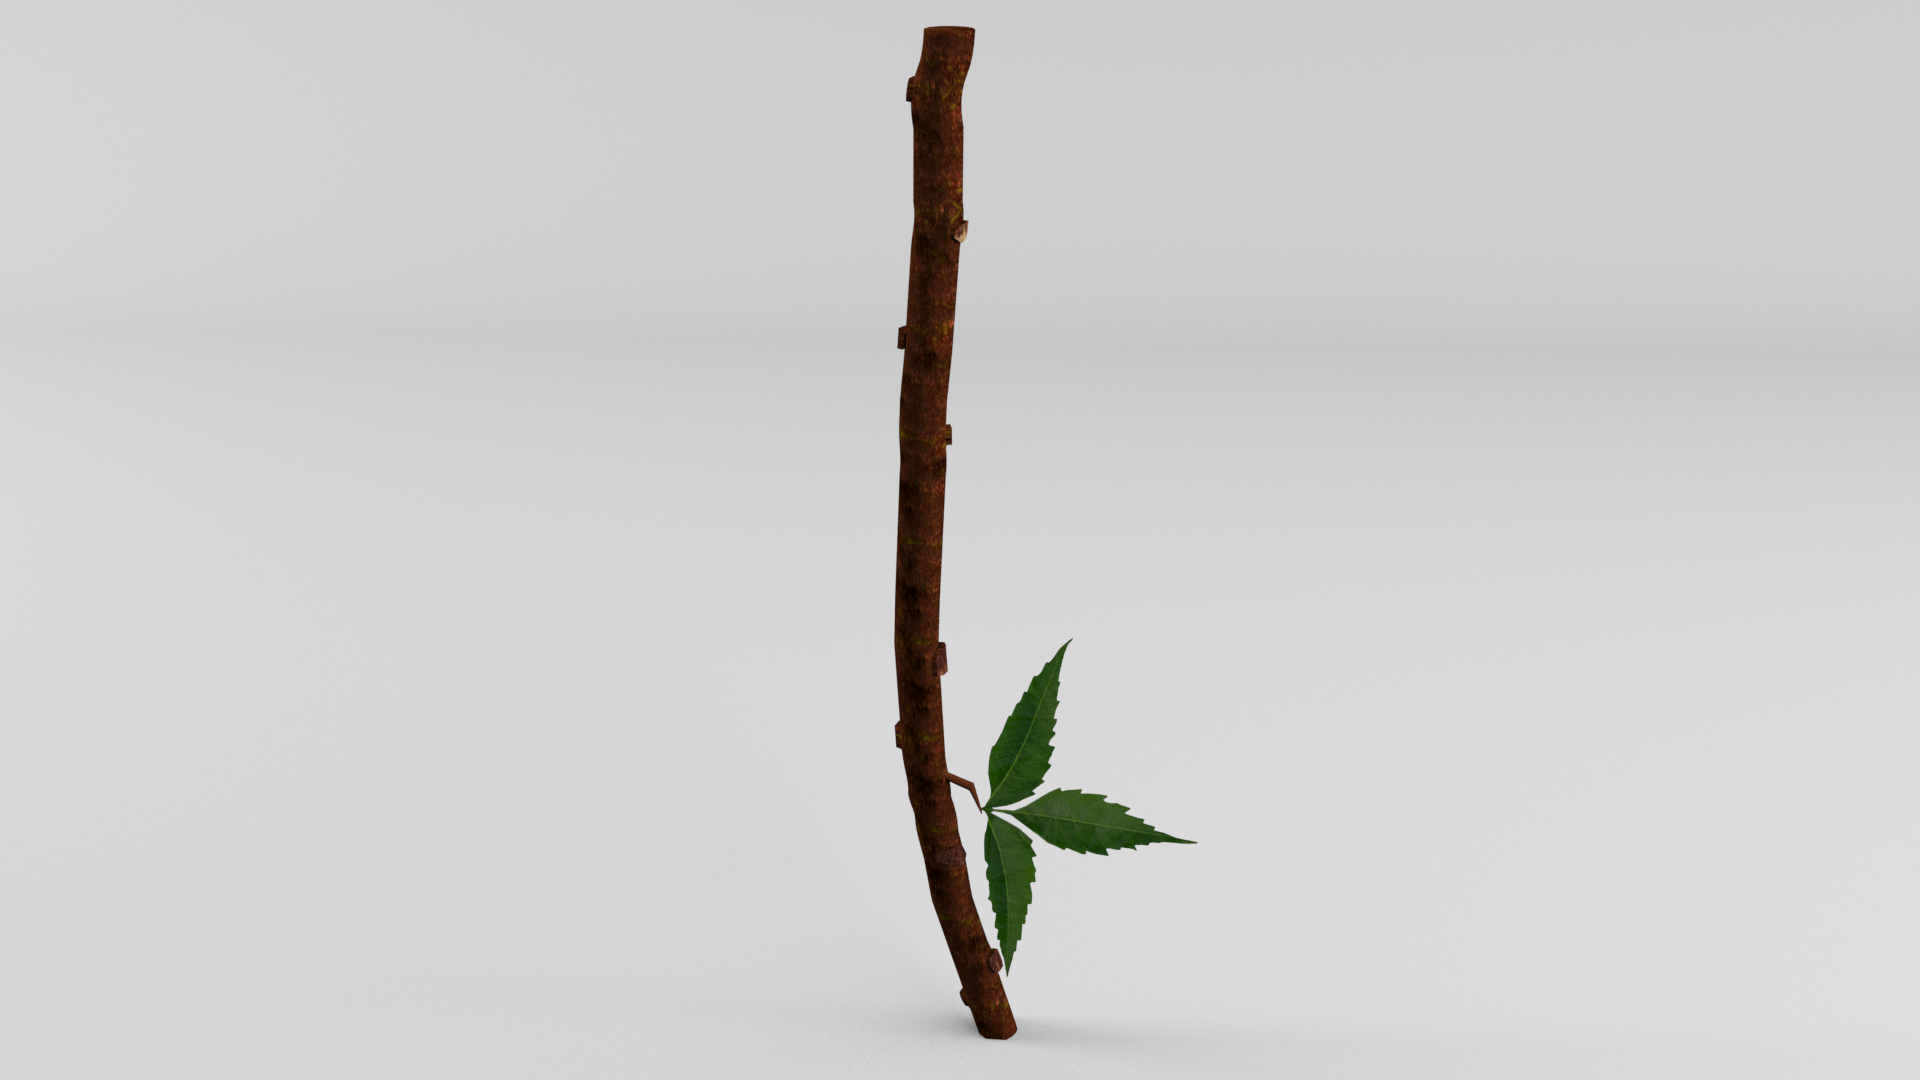 I think this Neem Twig (2017) by Splat Shop would be a perfect obstacle, since it’s small but is clearly an obstacle. I think if I have multiple of these branches blocking off the side it would be an obvious obstacle for the player to avoid.
Why I like it – How it does fit with the theme/game: I like it because it’s small, simple and clean and it has little details to it like the leafs on the branch, I also like how the branch is naturally bent, so it looks more realistic.
Why I don’t like it – How does it not fit with the theme/game: I don’t like how small and thin the branch is, it wouldn’t look like an obstacle due to its small size, it wouldn’t bring a threat to the player, and that’s really what I need in the game, I need to make it clear that the obstacle is a threat and it is going to stop you in the game, so ideally they need to be large and obvious.
—–
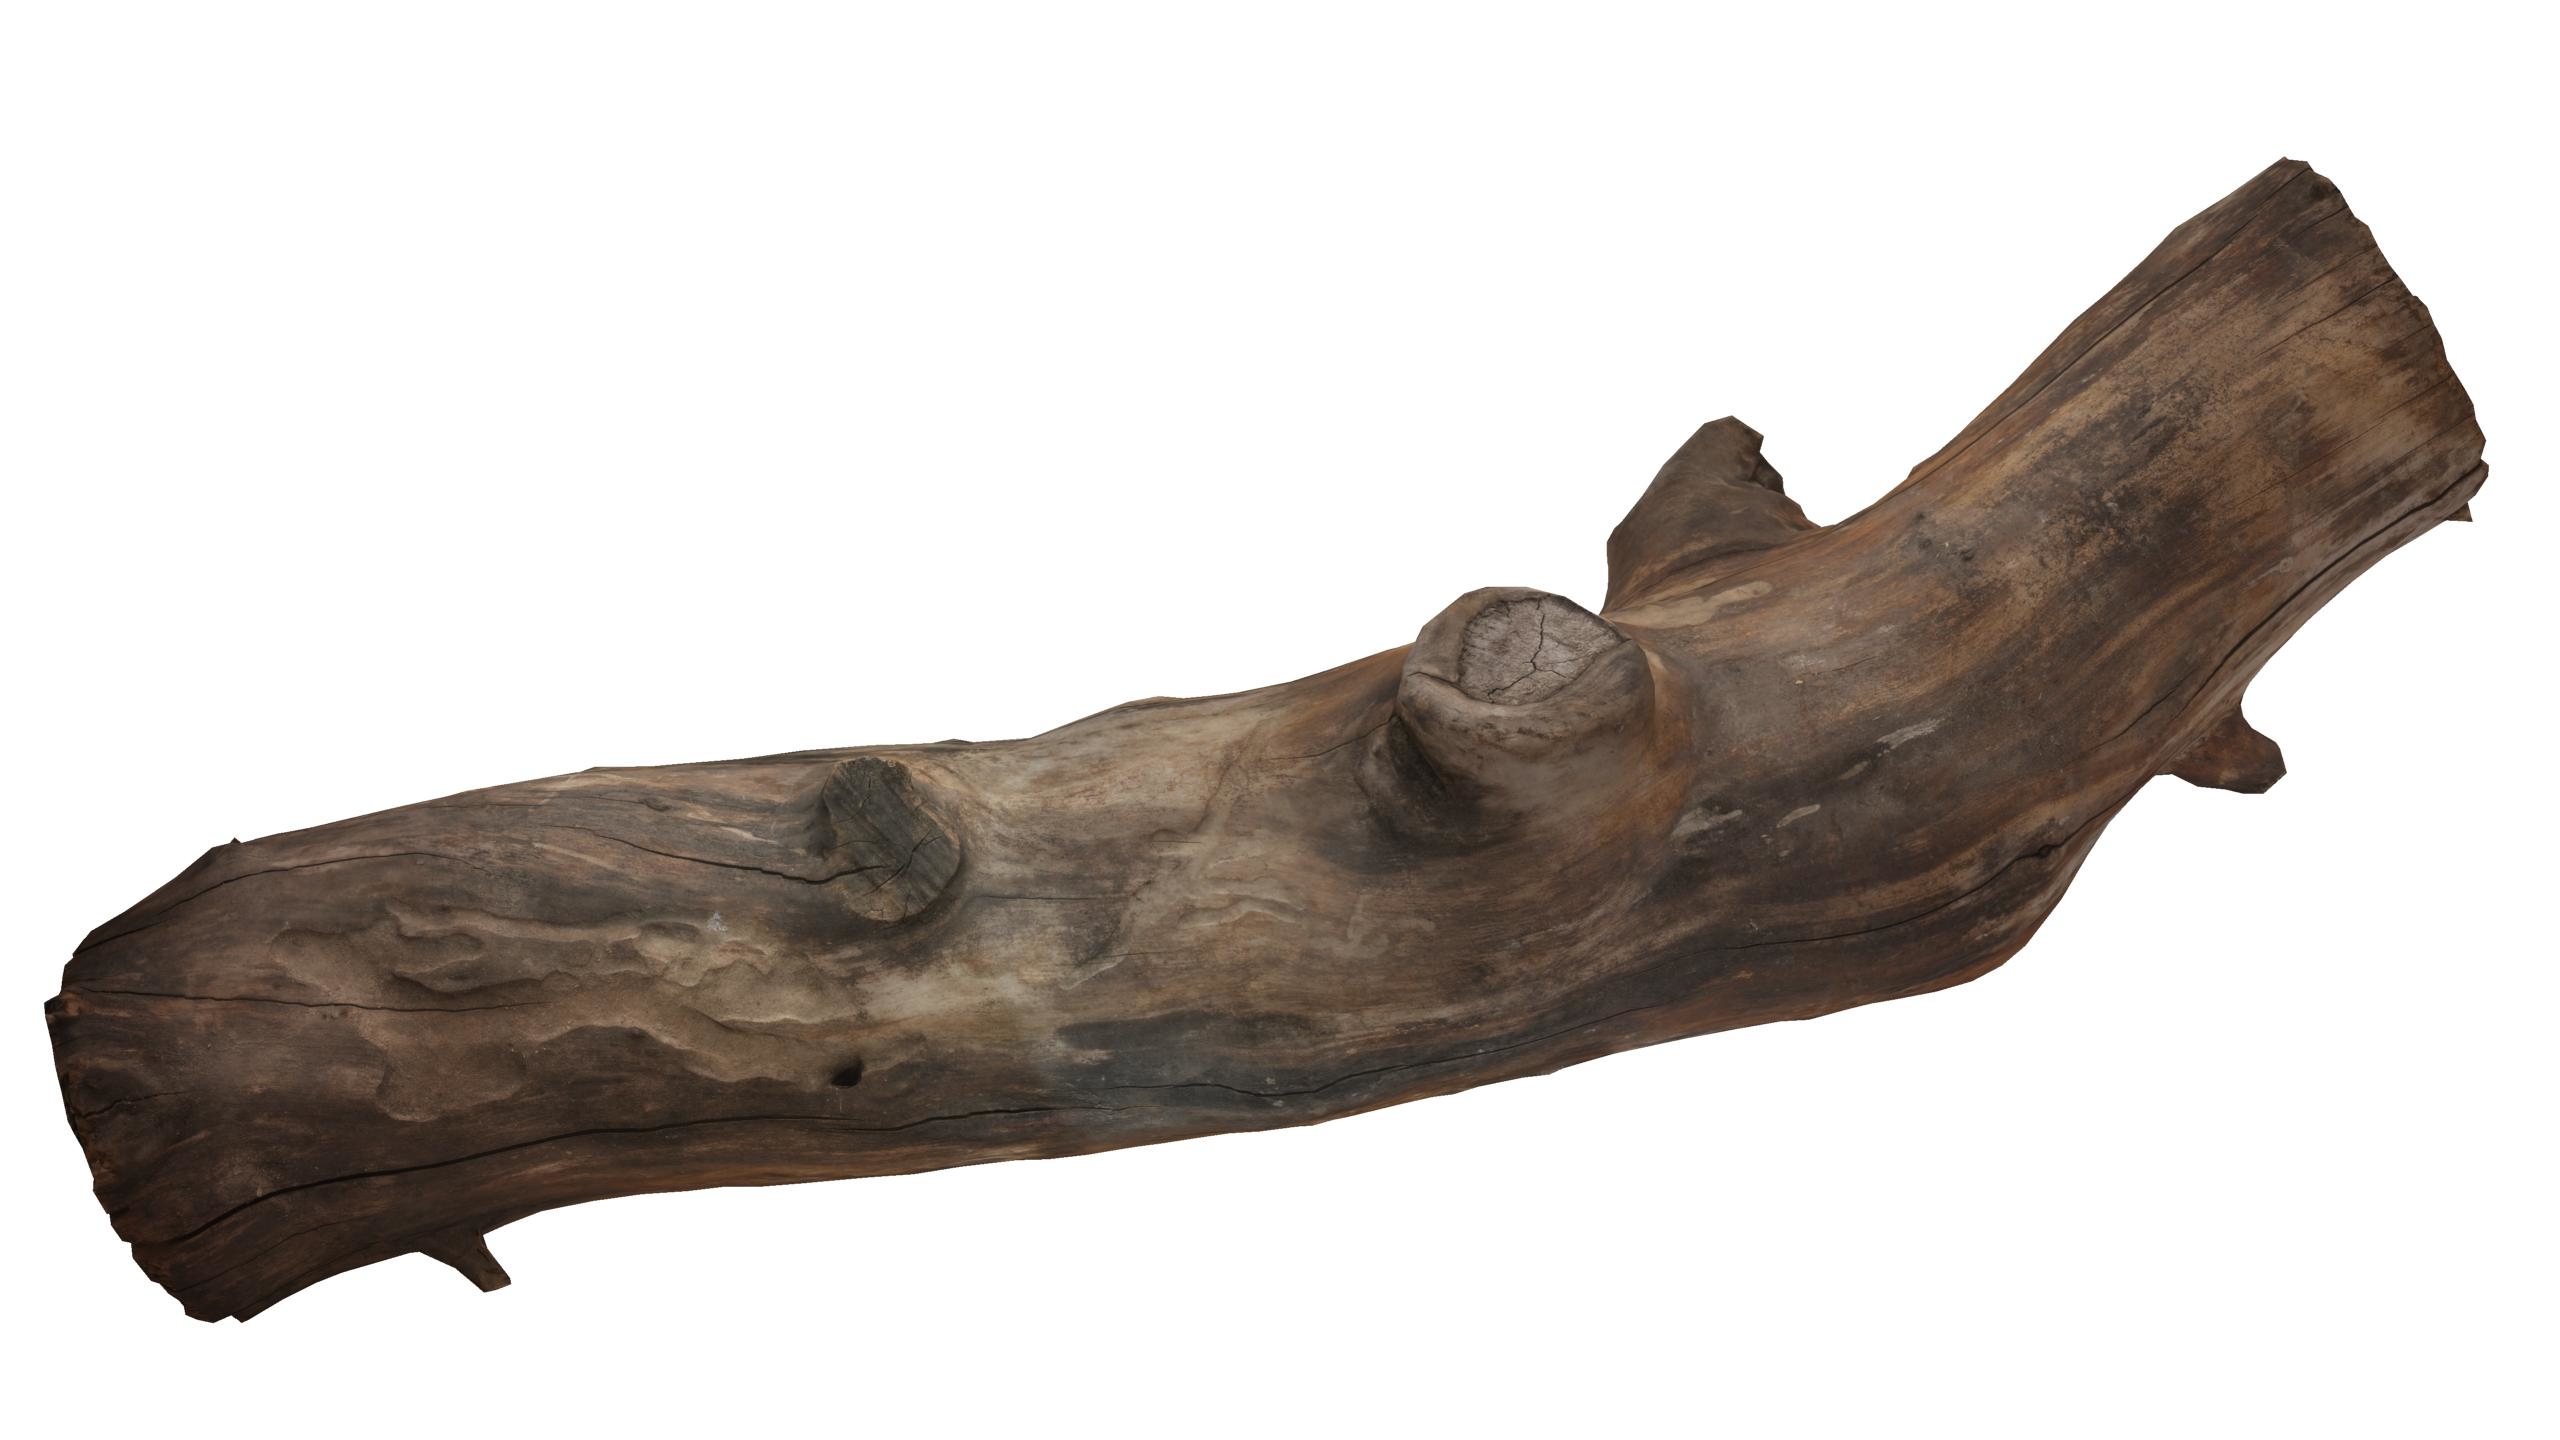 I think this Branch Rotten 15 (2015) by edikm1 would be a perfect obstacle to have on the top of the train where the player has to either jump over it or run around it, it’s big enough to take up the whole roof of the train width wise so it could be an obstacle that the player has to jump over.
Why I like it – How it does fit with the theme/game: I like it because it’s large, and it would be obvious to the player that the branch is an obstacle, it would clearly be in the way and the player would know they need to jump over it, I also like the detail in the branch, and how it is shaped like an actual branch, it looks very realistic with the textures.
Why I don’t like it – How does it not fit with the theme/game: I think it would be too big and repetitive to have in my game, and it doesn’t really make sense to have a branch on top of a train, especially one of this size. The texture is too realistic and it really wouldn’t fit in with the style of my game.
—–
 I think this Canal Bridge (2017) by CHETAN110 is a perfect obstacle for my player to duck underneath of, but then again, I feel like it doesn’t fit the western style too well.
Why I like it – How it does fit with the theme/game: I like this since it looks like a bridge which you would find a train to go under, it has a lot of detail on it and there is actually a path way on top of the roof which could also be used as an obstacle for the player.
Why I don’t like it – How does it not fit with the theme/game: It doesn’t fit in with the western theme since the western bridges tend to be wooden planks or stone bricks arranged disorderly, since they didn’t have too much money to make anything decent, this structure looks neat and looks more eastern, or something you would see in an area with more money, the textures are too detailed for the style which I am going for.
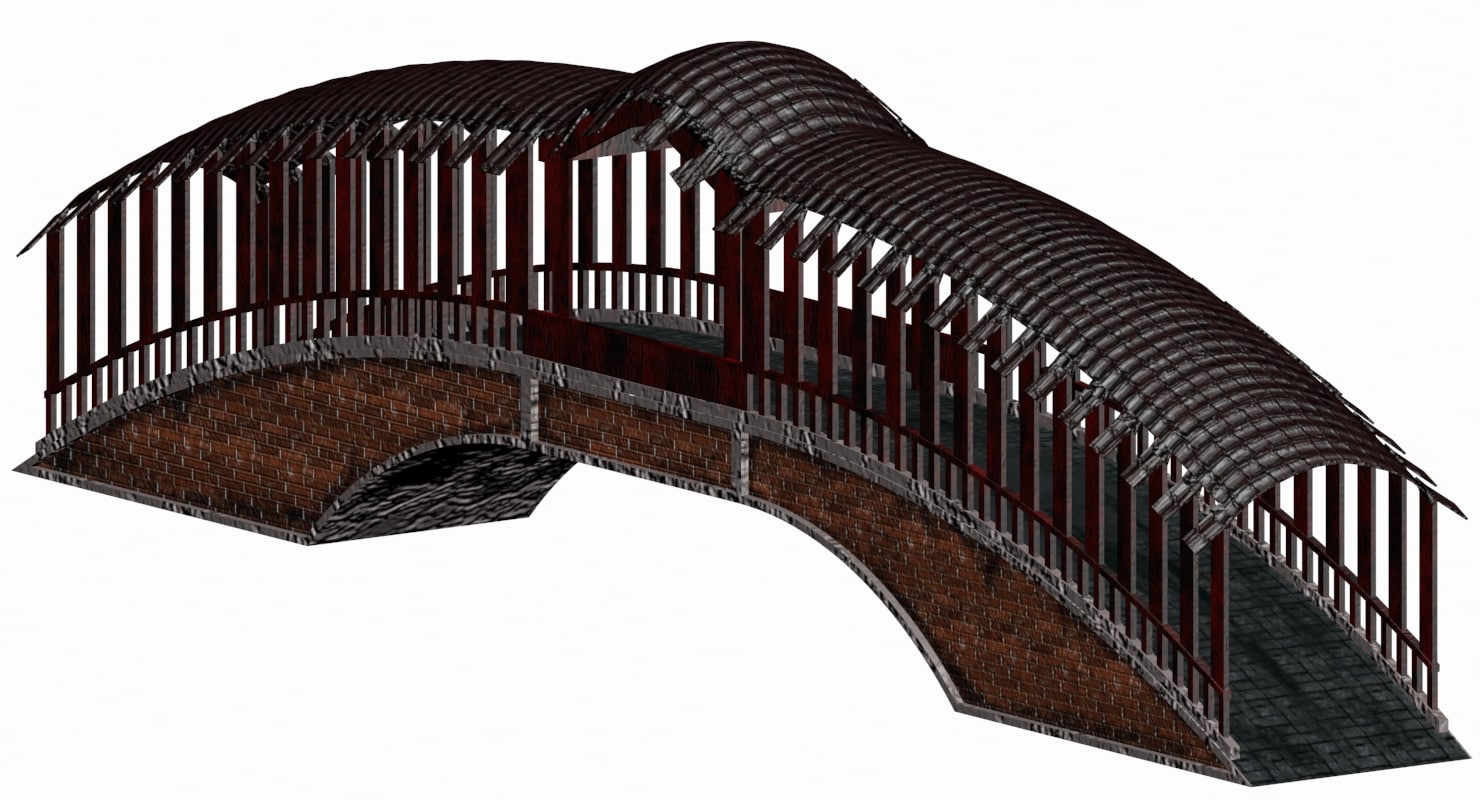
—– This Old Bridge (2015) by FxHellFire does fit the time period that Western is in, but it doesn’t fit the whole poor-western style. – I like this bridge though, it’s perfect for what I need it for.
Why I like it – How it does fit with the theme/game: I like this bridge because it looks realistic, and I really like the archway, and how this could also be used as an obstacle for the player to run over, or jump over, it fits with the western theme since bridges in the western era tend to be made of stone bricks or wooden planks which are built in a messy fashion, and this is exactly what I would imagine.
Why I don’t like it – How does it not fit with the theme/game: I don’t like how realistic it is, it won’t fit in with the style of my game, and I know I would need to scale this model to stretch it so the player and train can fit under it and the bridge pathway connects to the ground. It doesn’t fit in with the desert style which I’m going for in the game, I would expect there to be more crumbled rocks and sand in between the cracks of the bricks.
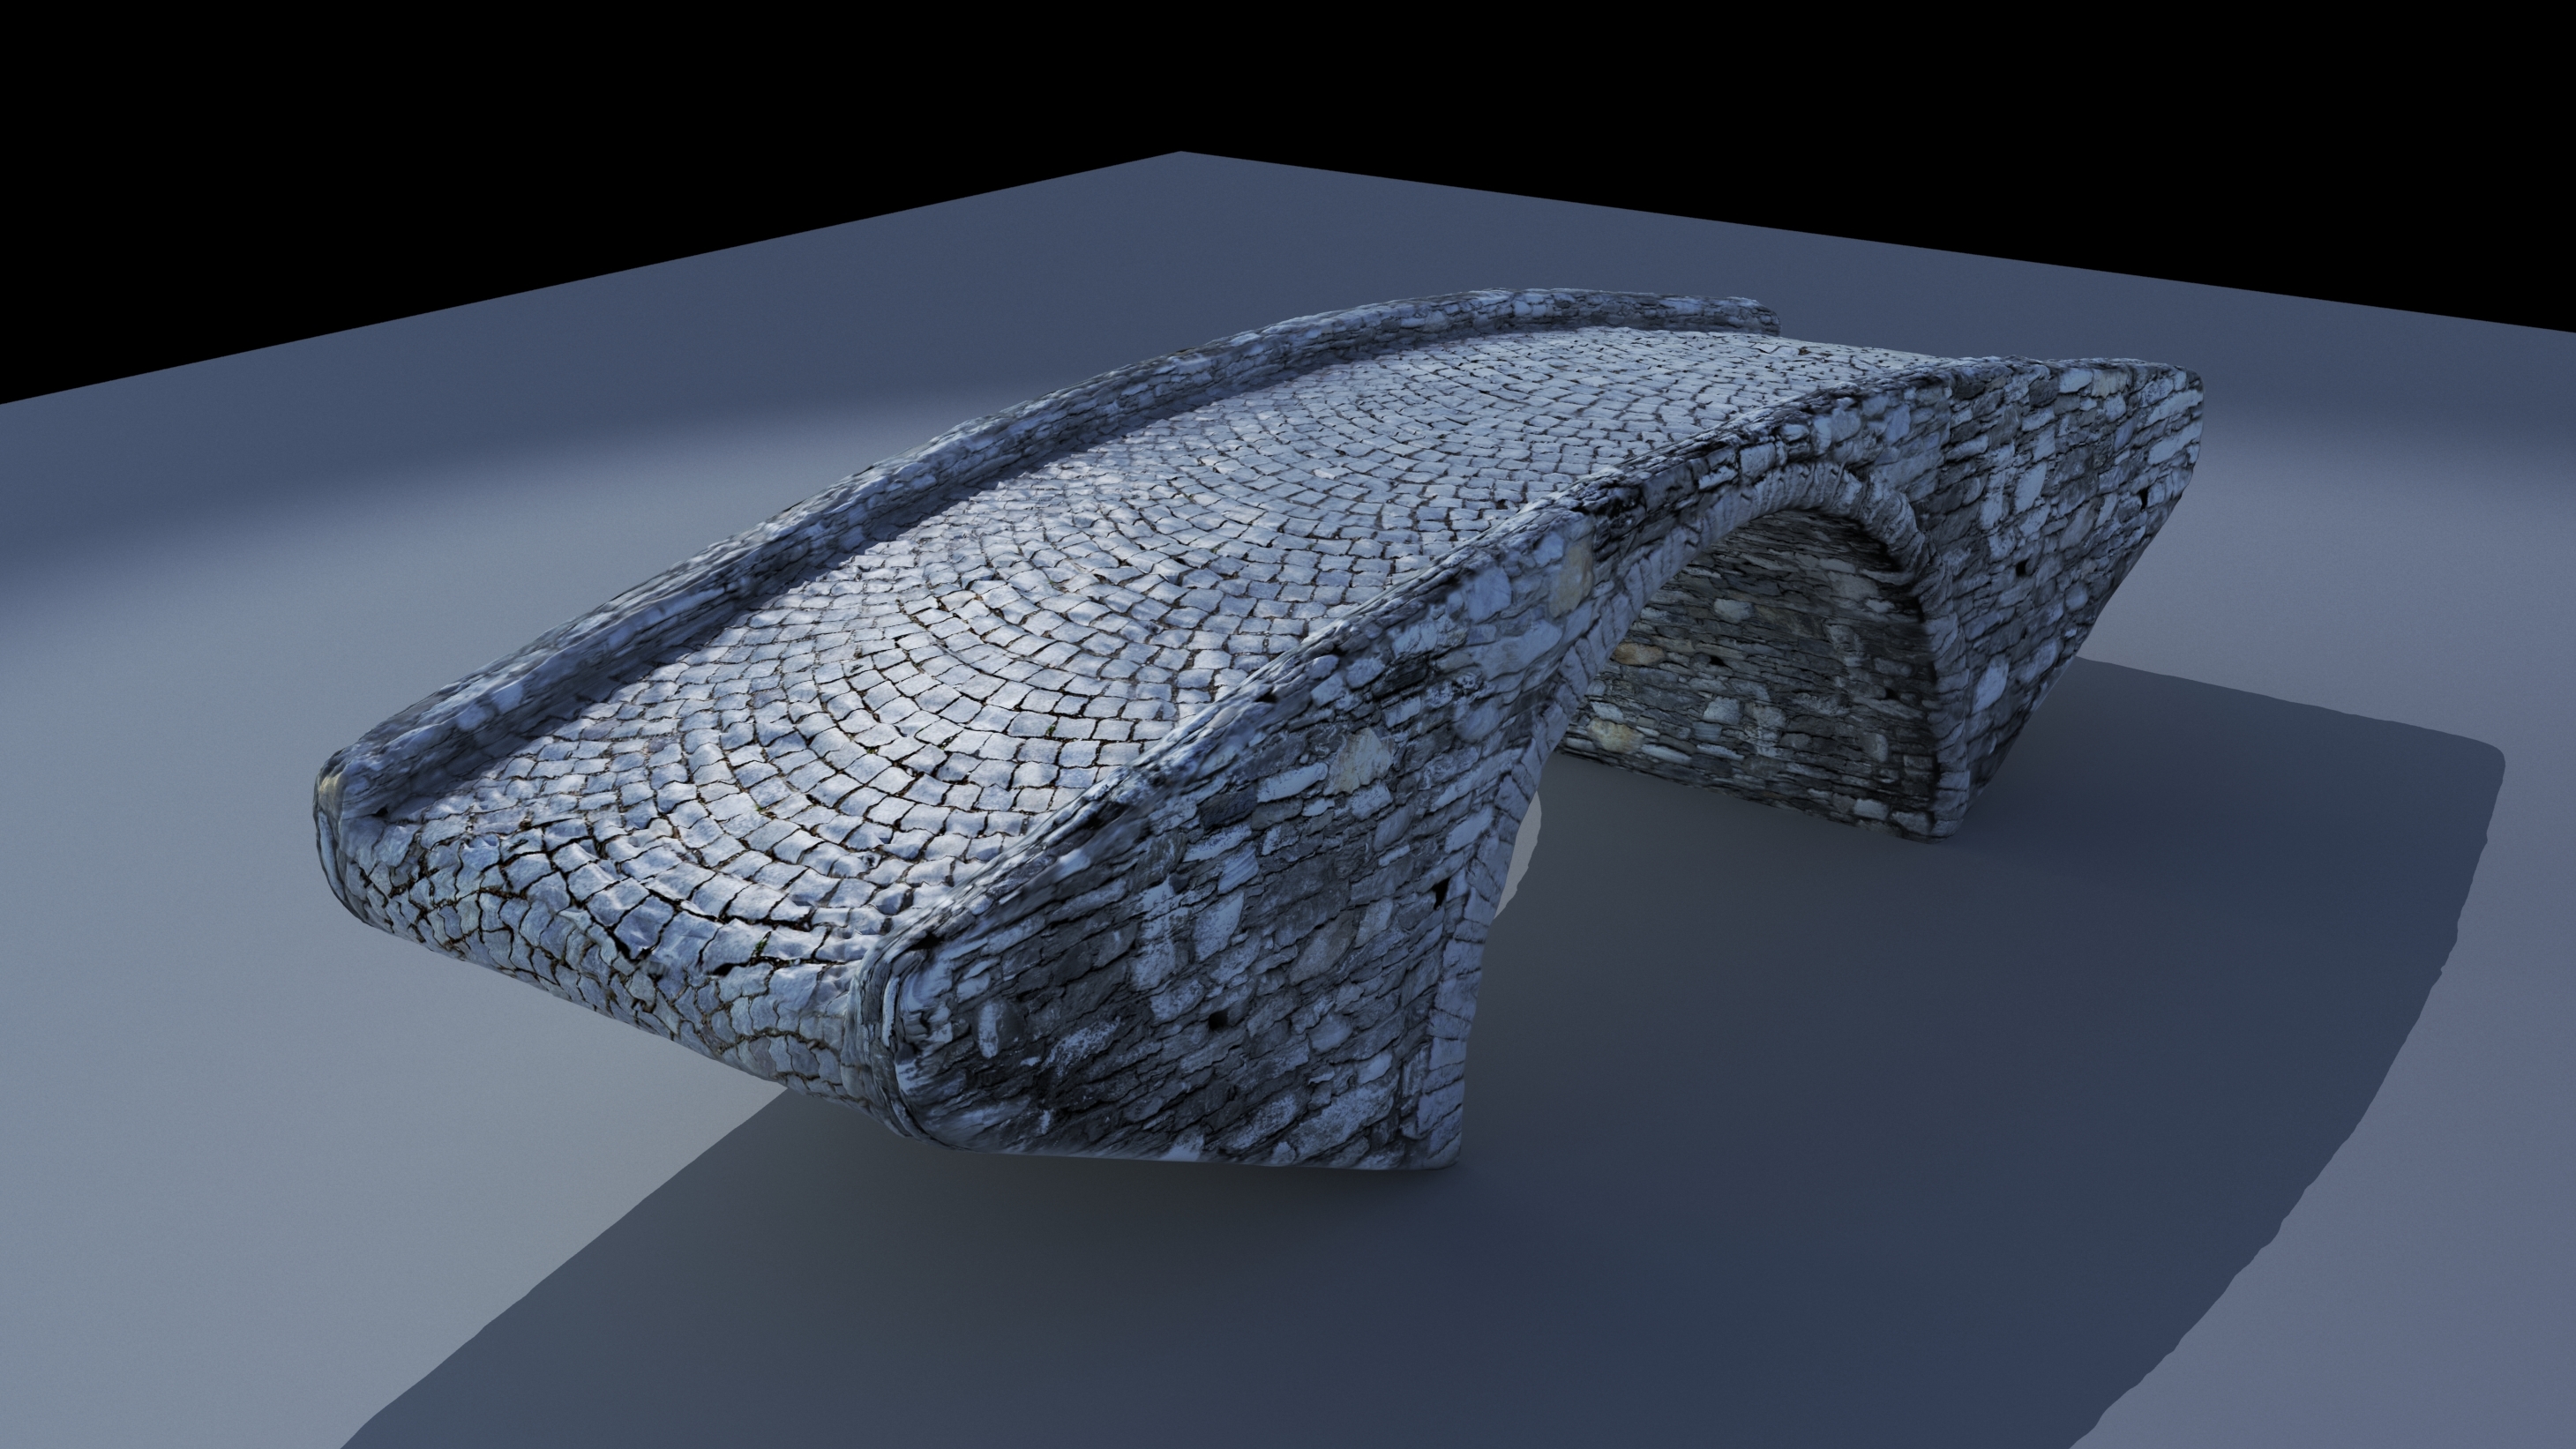
—–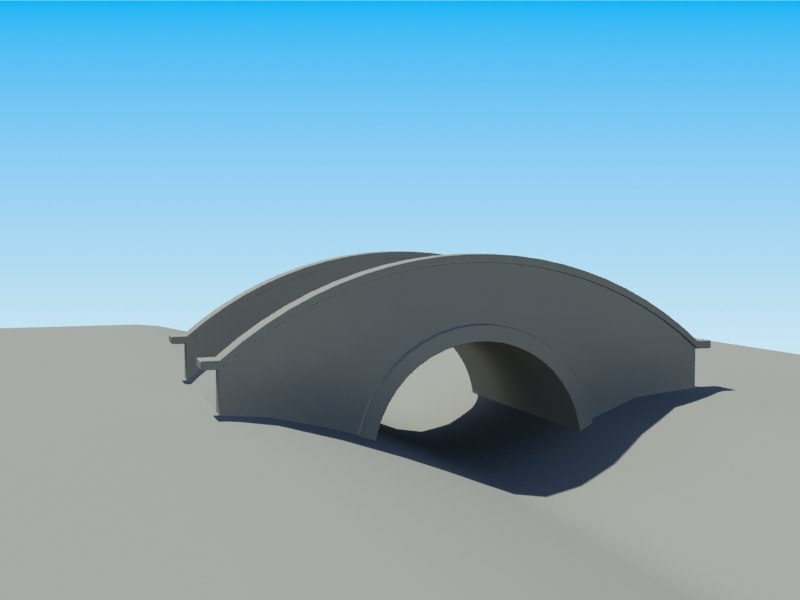 This Bridge#2 (2012) by Qiwer is most likely going to be the bridge which I go with since it isn’t textured, and it’s just the right size that I need, and it’s very simple.
Why I like it – How it does fit with the theme/game: I like this because it looks very simple, it fits very well with the low poly style which I want to go for in my game, I can apply a simple flat colour to this and it would still work just fine, since low poly models don’t tend to have a lot of detail in the texturing. It would fit in well with my game, I may need to resize the model slightly to fit the size of the train under it, and make sure it will always reach the desert ground and not be floating above it but besides from that I think it would look fine in my game
Why I don’t like it – How does it not fit with the theme/game: I don’t like how neat it is, and how it is a curved bridge, which means I would need to scale it a bit to make sure it always is set in the desert ground, I do feel like it would be a little better if it were to have a texture instead of one flat colour around the whole of it, it doesn’t really entirely fit in with the western theme.
—–

It was easy finding what model I wanted for my main character, I like this Tiny Cowboy FREE Free low-poly 3D model (2019) by runemarkstudio. It’s already rigged, and is very cute, it would appeal to my ideal audience immediately.
Why I like it – How it does fit with the theme/game: It fits in very well with the western theme since western era people wore cowboy hats and boots, and this is exactly what the character is wearing, it doesn’t have much detail in the body or the face, but that never concerned me considering the player would only see the back of the player, I think it looks adorable and really fits the low poly cute style which I was initially after, it would draw attention from my chosen audience.
Why I don’t like it – How does it not fit with the theme/game: I do wish that the character had more detail in it, or it was taller and fit more realistic anatomy, but not in a way that would make it look too realistic, but other then that, the character model is perfect for what I need him for.
—–
Objectives and mechanics (UML diagrams, Pseudo code, Mechanic cycles, Conveyance.)
For my planning, I thought it would be a good idea to make some flow  diagrams of how I roughly want my code to work out.
Since I’m using Unreal Engines Blueprints, it would be hard to do Pseudo Code in C++ so, I feel like the approach I’ve taken here is good for planning out what I want to have mechanic-wise.
The first mechanic is Run forward without input, a simple plan on how I would get my movement mechanics working for my endless runner.
From this diagram, you can see that I’m using the Get Forward Vector and Add Movement Input, and I’m then hooking them up to an Event Tick Node, this would activate the moving forward for every tick, which is exactly what I 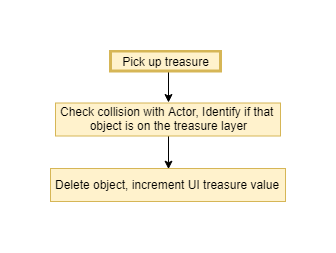 need!
need!
My next mechanic is the Pick up treasure mechanic.
This is very simple, all it does is check what layer the actor is on when the player collides with it, if it’s on the treasure layer, the program will identify it as a treasure so the object will disappear and the Blueprint will interact with the UI and increment the UI treasure value counter.
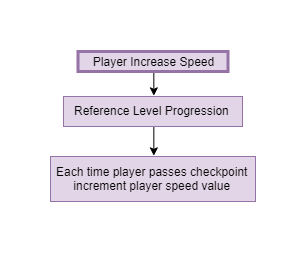 My next mechanic is Player Increase Speed what this does is checks every frame if the player has collided with the levels checkpoint, and if they have, increment the player speed value by a certain amount every time, making the game more challenging and require faster reflexes to the objects around
  you, this is similar to the mechanic in the game Thumper, where each level the player gets faster until you only have less then a second to react to the obstacles. Thumper (2016)
My next mechanic is a health system, these are crucial in my game, since 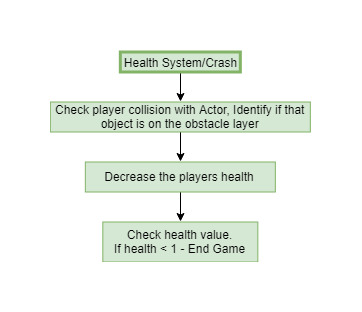 there would be no threat if there was an endless runner with no death screen! – The death mechanics would be what keeps the player playing, since it would be very boring with no lose condition.
What I have planned for the health system is each frame, the game is going to check if the player is collided with anything, if they are, similar to the treasure collecting, the game would check if the actor which the player collided with is an obstacle or a collectible, if it’s an obstacle, it would decrease the players health, interacting with the UI to display this, and then, each time the player gets hit it will keep checking if the health is below 1, and if it is, the lose screen will come up.
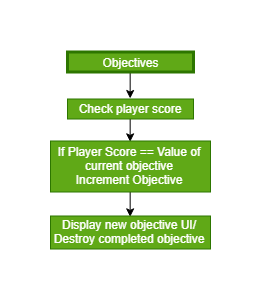 My next mechanic is Objectives. My plan for this is to check the players statistics every frame.
Some objectives may require the players gold collection, score, checkpoint, etc.
So for whatever objective is active, it will check if the value of the score is what it needs to complete the objective, and if it is equal to the goal, the UI element will be enabled showing that you’ve completed the objective, and then the next objective will be shown for the player to complete. I think this is a really good idea because it makes the player want to play more because they want to complete the goals.
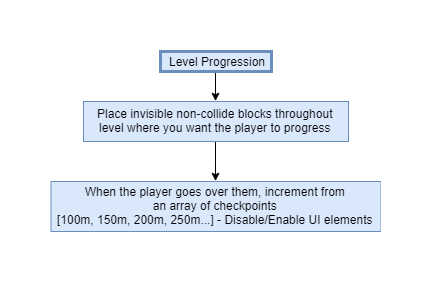 My next mechanic is Level Progression, this will check if the player has got to a check point, and how it does this is invisible blocks will be placed throughout the level, and if they player goes over them, they activate some UI which shows them what checkpoint they’re at, this would be an array of integers which tell the player how far they’ve got in the level, another way I can do this is make a value increase every time the player moves forward, and if they get to a certain value, the UI for the checkpoint would appear.
 My next mechanic is keyboard movement this works by allowing the player to move between 3 points on the top of the train, this will work by having the co-ordinates of the 3 points and having the player move between them with a snap animation, I was also considering making the points just blocks which the player moves to, but in the end, I’m not sure if I want this to be the case as it is very restrictive on movement and I think it would be better if the player can move wherever they like left and right without any snapping to co-ordinates.


Here I have done a written plan on how I want to get the collectibles and interactive items to work in my game, this is pretty much a step-by-step plan of what I want to do to make them.
- Placement of Spawn Points, Pick ups, quests, doors, rewards, checkpoints, triggers etc.
Since I want my game to randomly generate the levels, I instead began a plan for how I’m going to get that working.


I got this research through an Unreal Engine video, the man who made it done this at a talk in Japan, in Japanese, but he was kind enough to do it again in English to show us how he got it working.
I used this video, alongside Unreal Documentation to understand Syntax and how he got the endless tiles spawning as the player moves forward.
This is just the tiles generating, and not the obstacles and pickups.
After the player has passed each tile, there would be a collider which tells the program to put another tile down, and then delete the tile behind them, this ensures that, if the player keeps playing, there isn’t hundreds and hundreds of tiles behind them which can take up space and make the game run slower.


This is my plan for spawning obstacles in the runner, within 3 random points which are set on the floor tiles, these randomly generate an obstacle for each floor tile.
Task 3.2
Testing Code/Level Testing
Run Forward
This is my Blueprint for my run forward function, it makes the player run forward without any input, and this is what all endless runners have, I stuck to my plan which I had before, and added an Event Tick to my movement input, this means that the player would move forward without any input.
An Event Tick is when an event called every frame, if ticking is enabled, so this means the player would move on the forward vector every frame.
I didn’t have this enables for the left/right movement since I need the player to move left and right when they need to instead of automatically, since, that would mean there is no game at all! (Since you need to avoid the obstacles)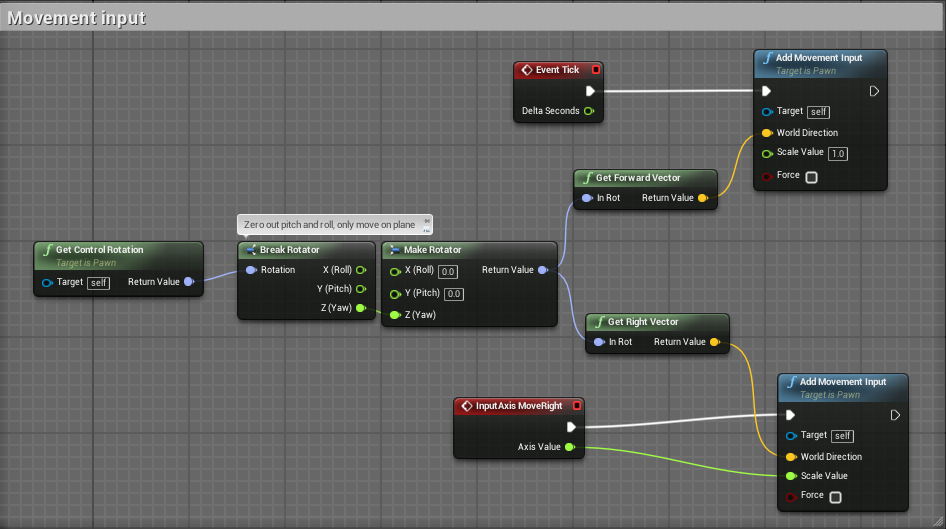
Jump Pad
This is my Jump Pad function, I would use this in the game so the player can proceed, places which I think would be useful for this to be used would be at the links between different train carriages and to collect collectibles in the air. So that means they would have to be randomly generated, but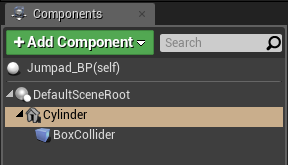 within certain conditions, so, they get randomly generated, but they have to have a few coins above it, or it has to detect whether is it at the end of the train carriage, so if it’s at the end, have a jump pad without coins so you can jump across to the other carriage, and if it’s not at the end, have a few coins above it so the player can collect those.
How does the jump pad work? Well, I started by making a new BP class (Actor) and then on that, in the view port, I added a new Cylinder component (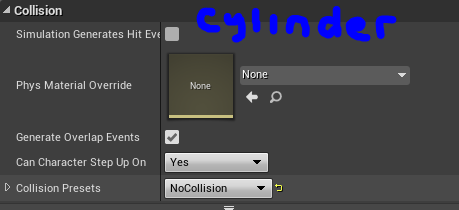 Or it can be whatever mesh you want it to be) and resize it to my desired size, and in my collision presets I changed it so it had No Collision, this is because I want the player to collide with the box collider which we are soon going to be inserting on the cylinder since I would personally prefer the player interact with the jump pad before they actually walk over it, since from their point of view they would be confused as to why they weren’t jumping as the camera is in orthographic mode, so the jump pad would look as if it appears and the player runs over it sooner, so, with the cylinder selected, I added a box collider component and resizing it to my desired size. On my box collider details, in the collision settings, I have to make sure that Generate Overlap Events is on, what
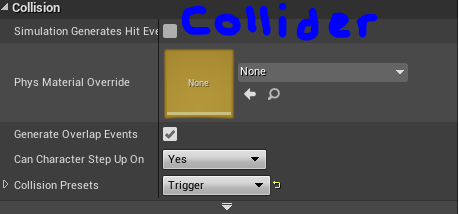 this is it checks if that is turned on, and then it can do Overlap Events, if it’s false, then when the player overlaps with the collider, it wouldn’t do anything. I then set the collision preset to Trigger – And this basically means, that when the player collides with the collision box, an event will trigger.
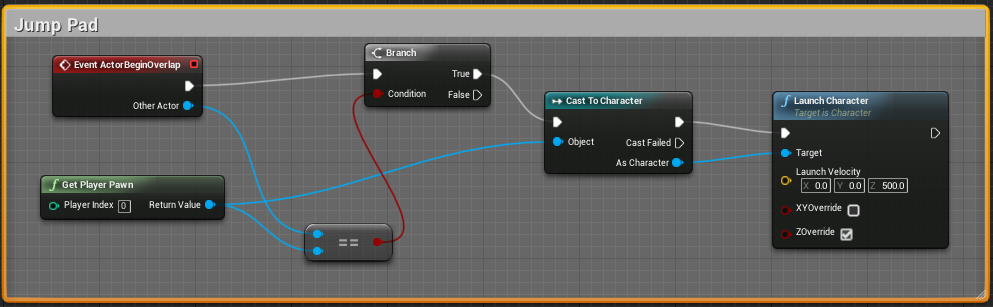
And the event is the Blueprint below, which is how the Jump pad works.
At the start, we have an Event Actor Begin Overlap, which is connected to a branch, which is basically a Bool condition, it checks if the condition is == (Equals to with double equals) the Get Player Pawn, and this Get Player Pawn is connected to Cast To Character, which essentially calls the player character object.
If the branch is true, the As Character is Launched with the Launch Character node, and the character is connected to the target of this, then we set the Z axis to how high we want the player character to go. We Override the Z axis so that the velocity of the player doesn’t keep increasing, for example, if they player were to keep bouncing on it they would get higher and higher and we don’t want that, we want them to jump the same amount each time, but they wouldn’t get an opportunity to do that anyway since they would keep on going forward.
Collectibles
This is my collectibles function, it is used throughout the level for the player to collect negative buffs or coins.
How the collectibles would work in my game is they would randomly be placed throughout the floor tiles for the player to collect, they would collect these and avoid the obstacles to collect them, sometimes these collectibles could be next to a jump pad so they collect them in the air.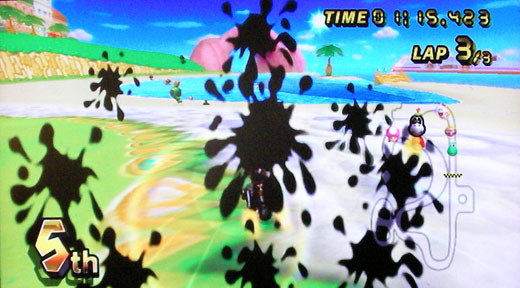
There is going to be 3 different types of collectibles at the moment, a beer bottle, which is a debuff, it would make the screen fuzzy, and hard to see, this debuff is similar to how the squid debuff works in the Mario Kart games – Mario Kart Wii (2008) Nintendo
It would be a distraction to the screen for the player, so the player has trouble navigating, they have to trust their senses, and hope they don’t bump into anything, these bottles would be something the player would try hard to avoid.
And then you have the Gold Coin collectibles and the Gold Brick/Bag of Gold, these would be collected and added to a separate score from the main score, this would total up and be the amount of gold which the player has collected, and using this they can purchase items which can boost their performance for a certain amount of time, upgrade things or change the appearance of other things.
I made the collectibles by having a main collectible function, since depending on what object it is you’re collecting, there is a different output.
How the collectible FUNCTION works, is I began by making a Blueprint Actor 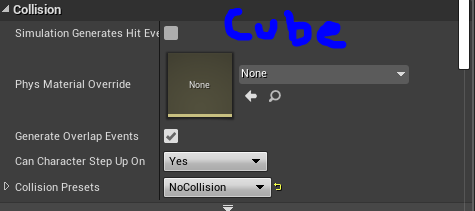 and adding a Cube component, this will be changed to whatever mesh it is later on, but it’s just a cube at the moment to test it’s functionality.
I set the collision of the cube to no collision in the collision presets, otherwise the player would get stuck, and then I added another component, a cube collision, and this, in the collision presets is set to Trigger, and like the jump pad, we have to make sure the Generate Overlap Event is enabled.
And then we come to the Blueprint.
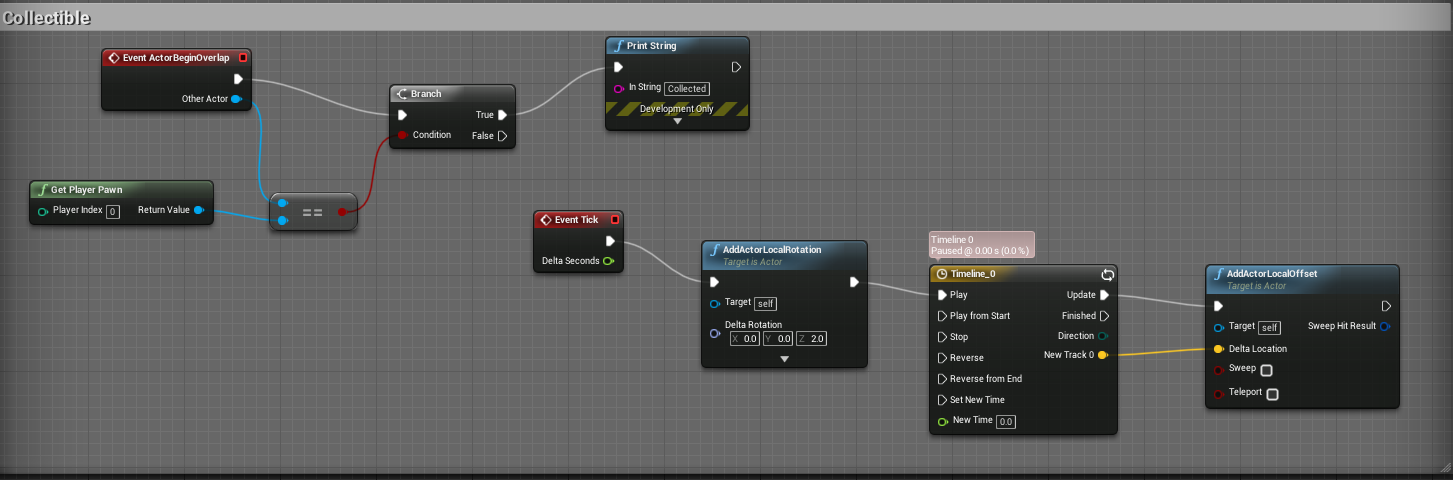
What happens here is, starting at Event Actor Begin Overlap, we need to use it since it is triggered on overlap, and then, the same as the jump pad, we have it connected to a branch which checks if the the player is collided with it, and if it is true, the string would be printed that the player has collected the coin, after this I would destroy the object, but that isn’t in the blueprint picture.
The event tick is to do with how the collectible moves, so using the Event Tick (Every frame) and add it to an Add Actor Local Rotation adds a delta to the rotation of this component in its local reference frame which, if we set the Z axis, would rotate the collectible around, just like what happens in games with collectibles, and then this is attached to a timeline which, on the timeline is connected to a vector track which is locked in the Y and X axis, and then made to move on the Z axis up and down, and then I enabled loop and cut it down to the right time, and then the update of the Timeline is added to the Add Actor Local Offset node, which adds a delta to the location of this component in its local reference frame.
Floor Tiles
These are the floor tiles which the player would be running along in the 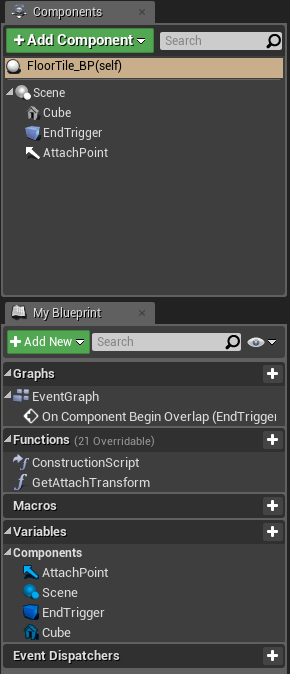 game, the mesh for the floor will be replaced with train carriages later on, but since I am just testing functionality at the moment, I used a simple cube to check it all worked.
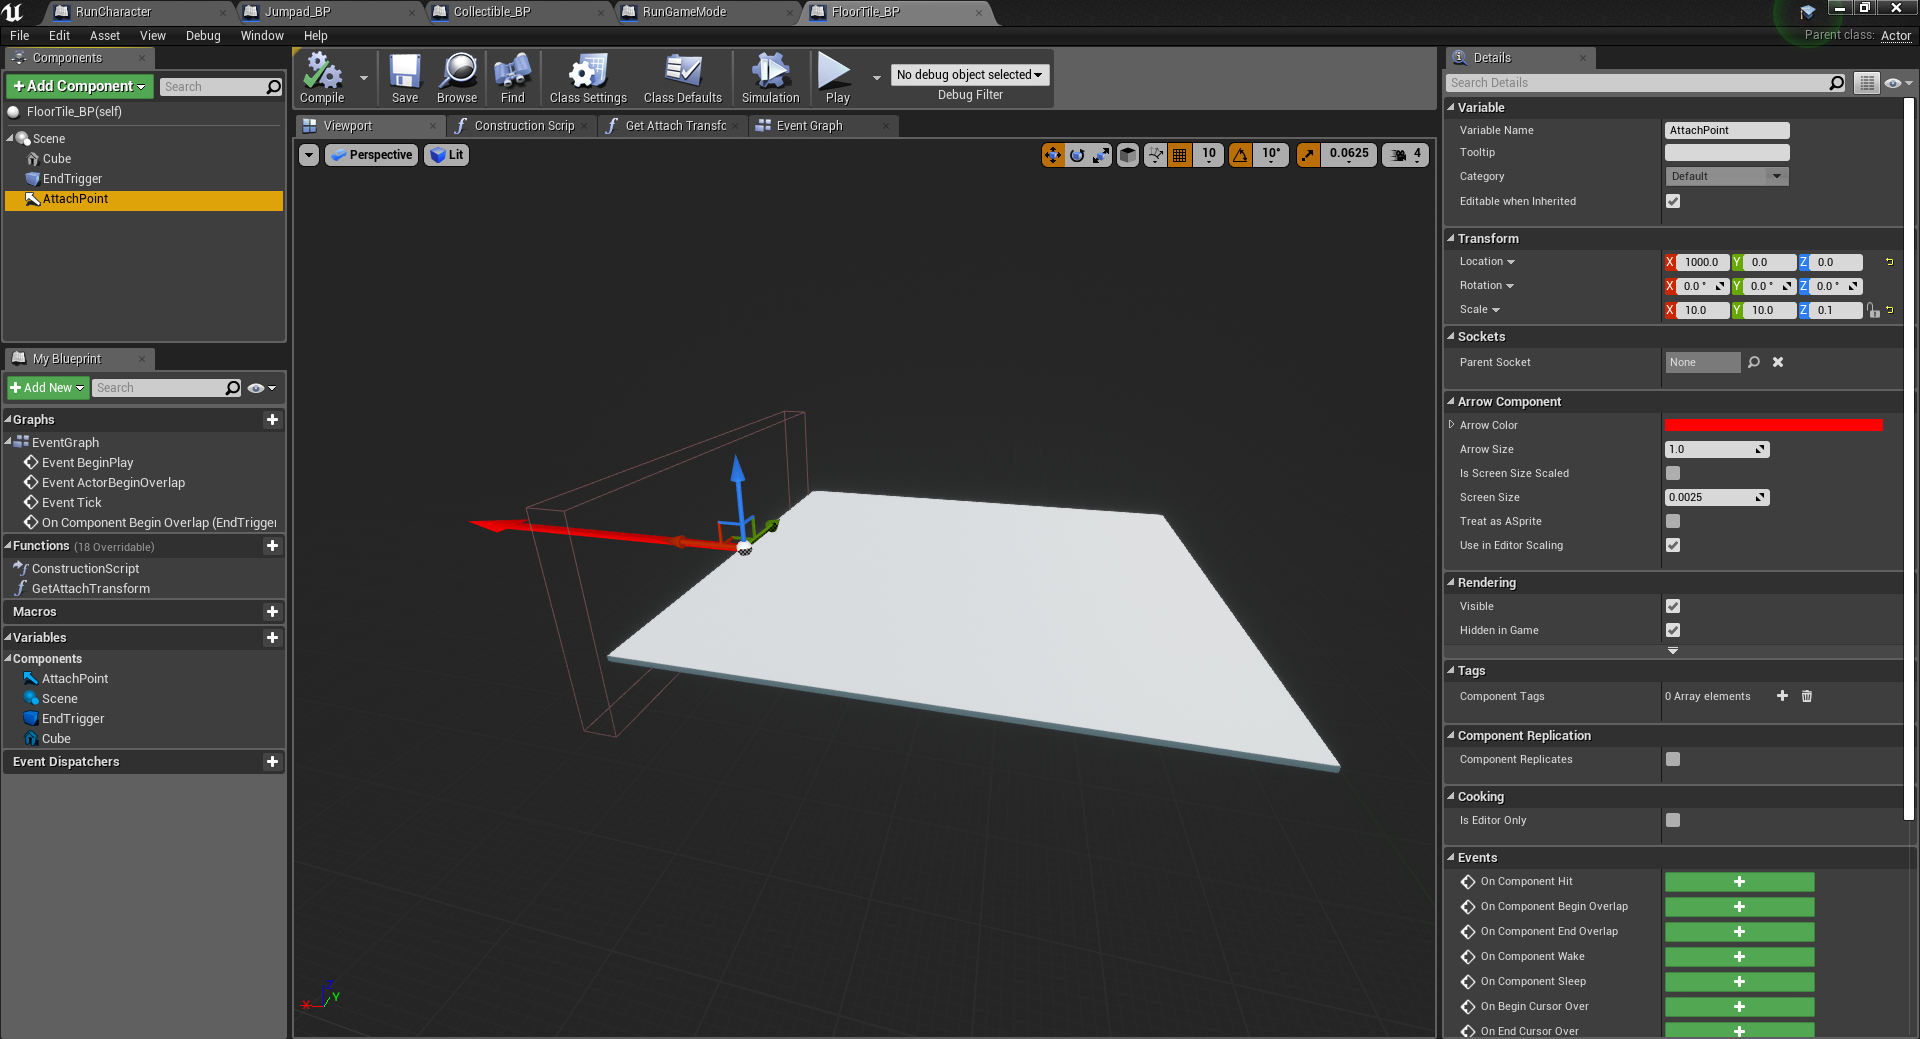
I began by making a Actor Blueprint, and adding a cube to it, which I will later change to a mesh, I then moved it 500 units along the X axis.
To give the floors a direction to spawn in, and a point I added the Arrow component to the Blueprint, I then moved it 1000 units along the X axis so it was perfectly inline with the floor tile.
On the function of my blueprints, I made a function which is for getting the point which the floor tiles are going to attach to, and it would ![]() attach from the new point, making it so the floor tiles would attach from the end of each other and not all in the same place. The return value of the Get World Transform of the attach point on the floor tile would update each time.
attach from the new point, making it so the floor tiles would attach from the end of each other and not all in the same place. The return value of the Get World Transform of the attach point on the floor tile would update each time.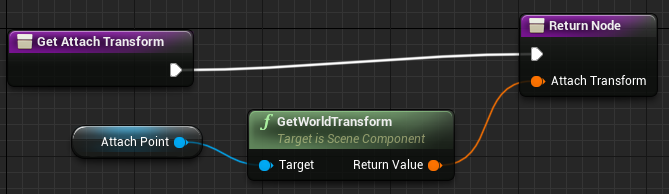
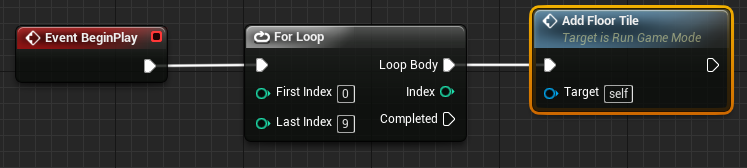
After this, I made a new function called Add Floor Tile, and what this does is it adds the new floor tile after the player had ran through the floor tile, firstly I added a Spawn Actor, and the actor I wanted to spawn was the Floor Tile, so it was Spawn Actor Floor Tile BP.
Then, I wanted it to spawn on my next spawn point, so I promoted Spawn Transform to a variable and named that variable the Next Spawn Point.
Here, when the game begins playing, the for loop adds 10 floor tiles, so then when the player is playing the game they don’t see a gap in front of them when they’re running, because there is plenty of floor tiles already spawned ahead of them.
And then, on the end of the floor tile I have a box collider called my End Trigger, and the collision on it is set to Overlap Only Pawn, which means it would only trigger if the Pawn overlaps it.


On here we are adding events which what happens when the player runs over the end trigger, from here, we call functions like Add floor tile to the top, and then we add a delay and then destroy the floor tile of the end trigger that we ran over.

 I had trouble getting this to work due to always getting infinite loop errors, but in the end I got it to work, and it was just some small mistakes.
To solve the error I added a few break points to find out why the error was happening, the breakpoints I added were in the blueprint which the error was bringing me to, I kept checking it over and over, and nothing seemed out of place, so I had a look at my other blueprints.
In the end it was nothing to do with that blueprint, it was fine, all that happened was I forgot to connect a node!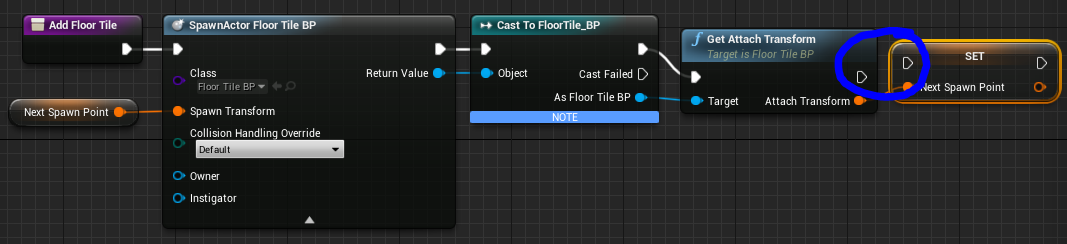 Now it was working. But I was facing another problem.
For some reason, the tiles spawned fine, but they kept resizing by 10 every time.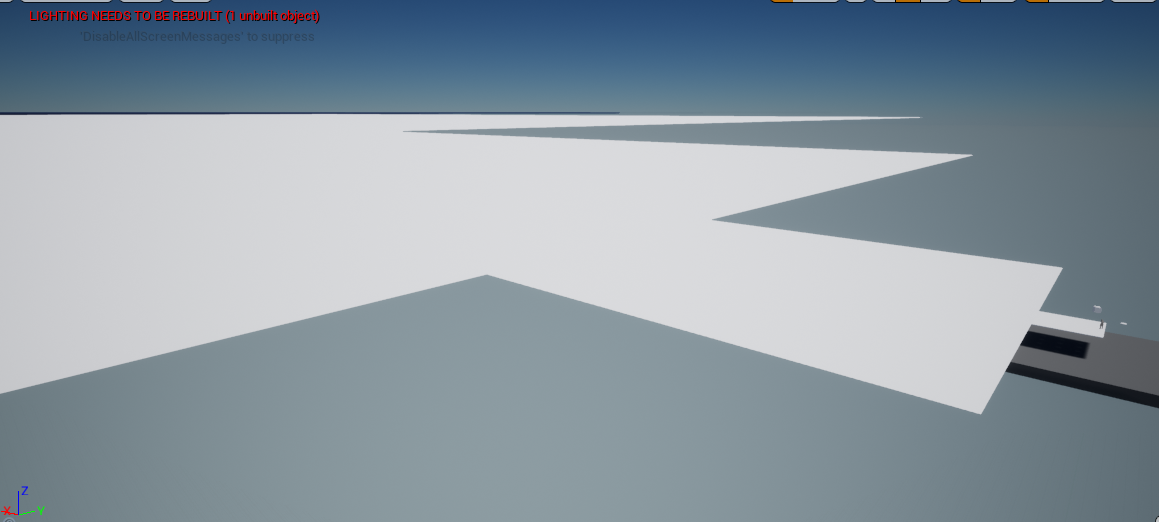
Since it was doing what I needed to, and it was to do with it resizing, I went back into the viewport and I looked around, at the end, I realized it was to do about the scale of the attach point.
When I scaled up the floor tile, I had the attach point as a child of the floor, so it resized with the floor and made the errors of the floor resizing every time and inverting itself since the Z value was so small on the attach point, so I set these back to the values which they should be, and everything worked in the end.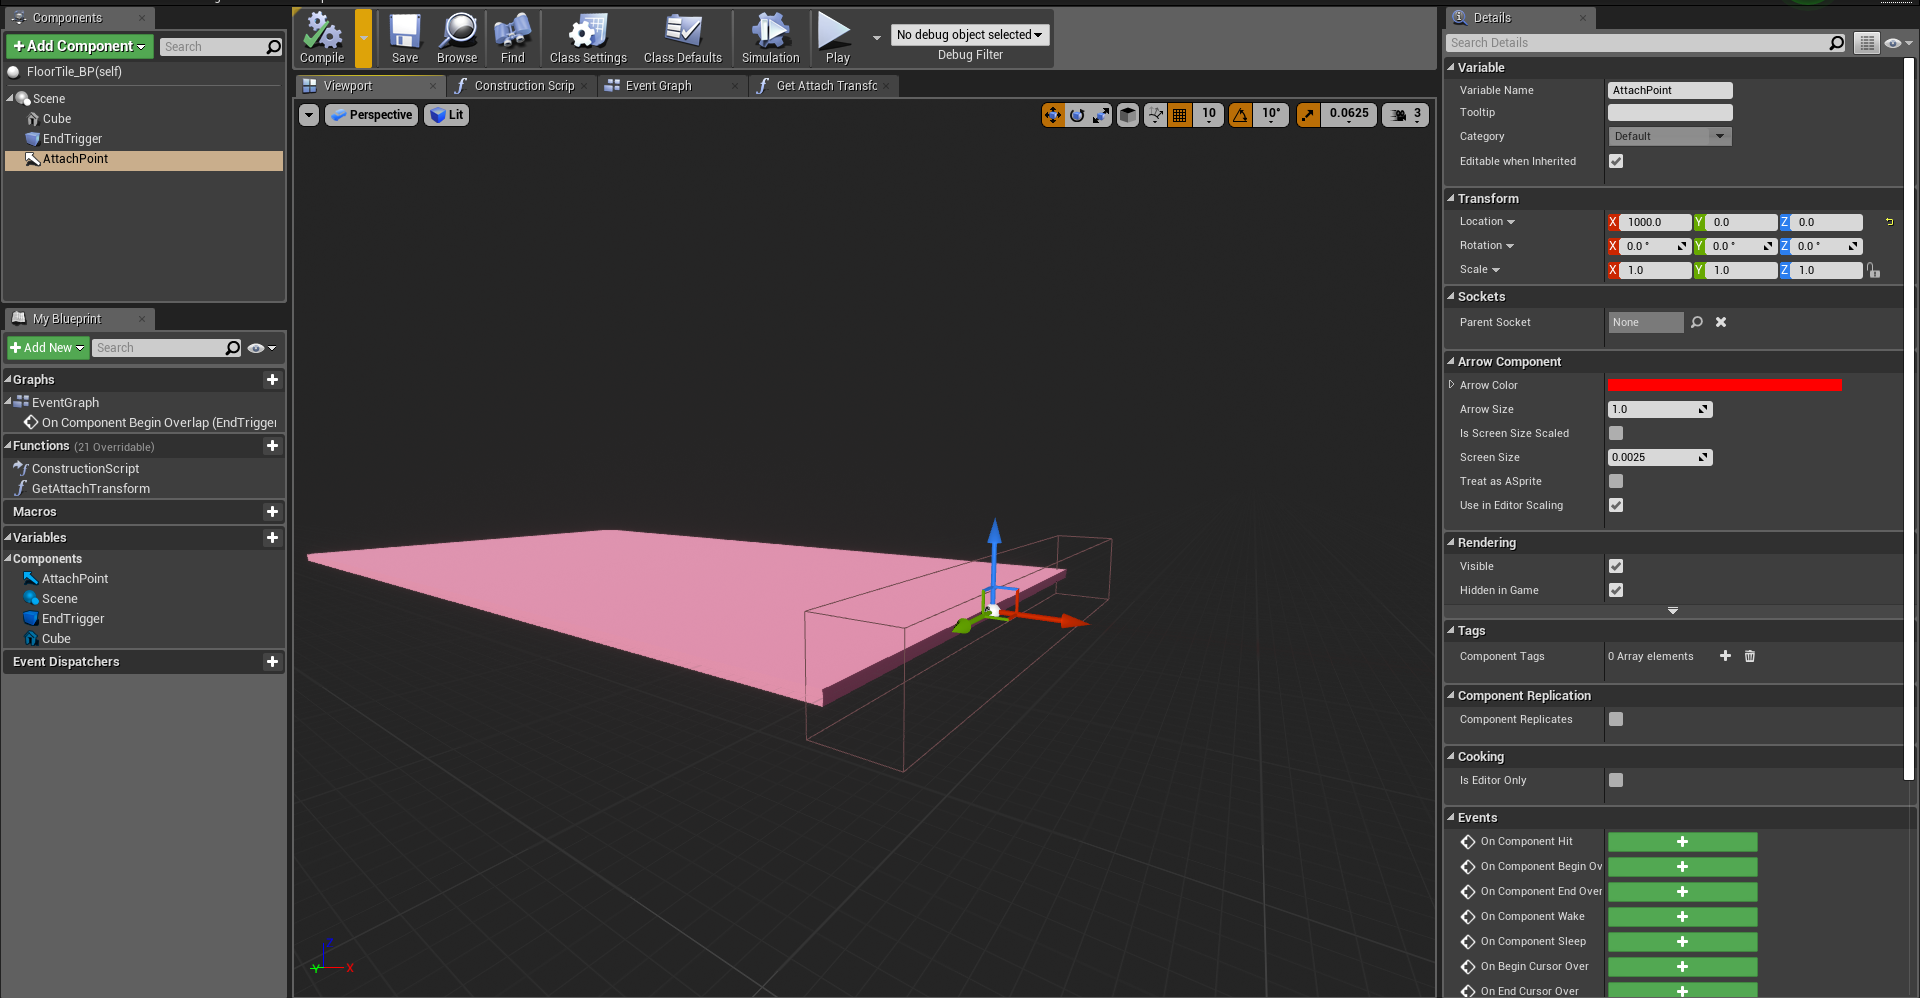
Blocking out
Sample Models/Testing Assets
I thought, since my game is based on the Western theme, and western is 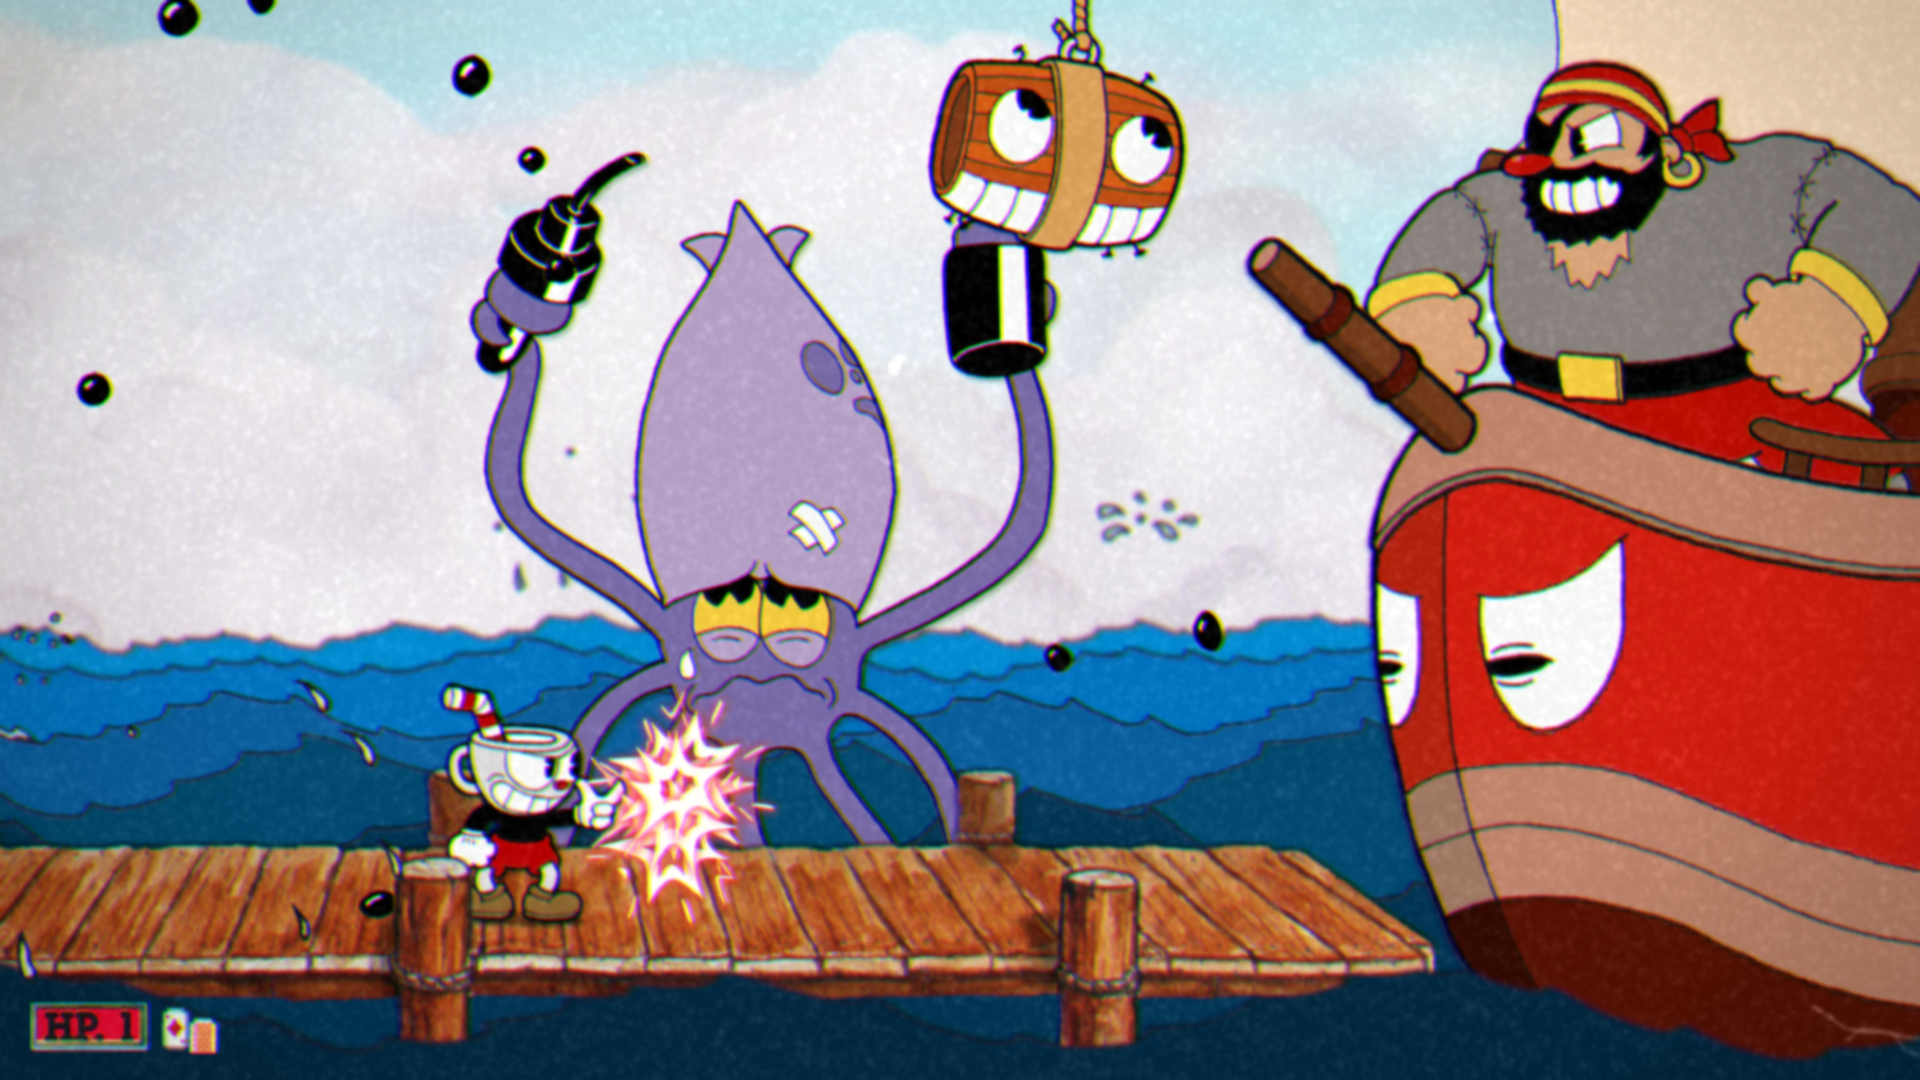 rather old-fashioned, my game could have low saturation, and look like an old film clip, sort of like how Cuphead made the game look like an old cartoon since that’s what it was based on.
Cuphead (2017) Studio MDHR, Studio MDHR Entertainment Inc.
 I still feel like a lot more could be done with the filters to make this look more old-western style, but this is just messing around with colour grading, grain and saturation in the Post-Processing Volume.
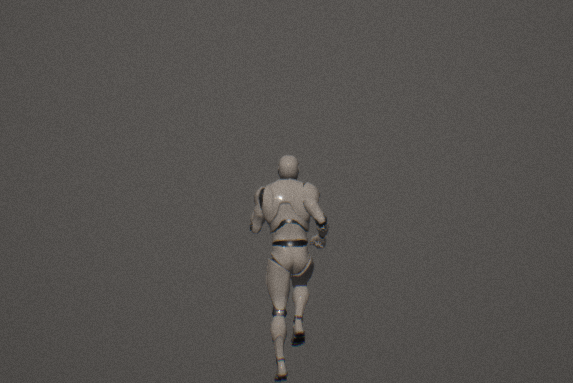
I imported the Tiny Cowboy asset into my game to test how it would look and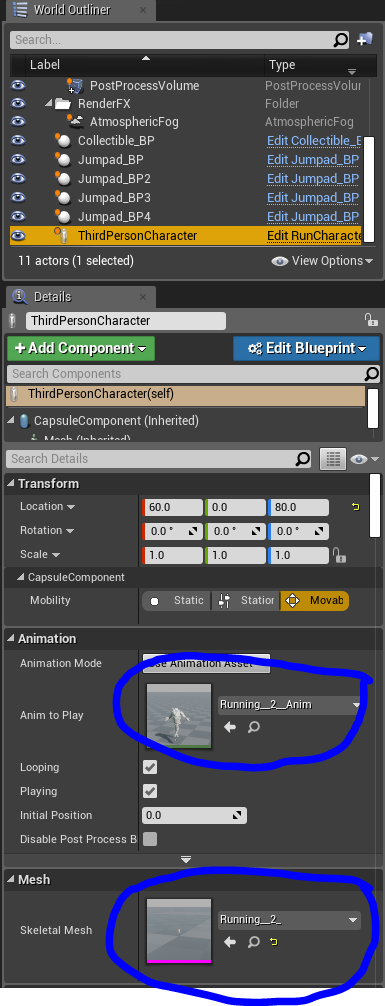 work, and to get the running working correctly (Since the Tiny Cowboy skeleton and the default Unreal Engine skeleton are different) I used Mixamo – a web-based service for 3D character animation, which use machine learning methods to automate the steps of the character animation process, including 3D modeling to rigging and 3D animation. I find this very useful since I’m not good with rigging or animation. Mixamo is free for commercial use, to get it working, all I did was download the FBX file for the Tiny Cowboy, and add it onto Mixamo, and then, once that is done, all you need to do is pick an animation, and it would work.
To get everything working, I had to select the third person character from the World Outliner and change the Skeletal Mesh and Animation, otherwise, it would’ve used the default animation and it would’ve all been messed up.
After that, and some adjustments to the scaling and collision, I had finally got the main character model in the game and working.
But, then I realized the Camera on Orthographic mode really didn’t look nice, so I changed it to perspective and it ended up looking a lot better in the end in perspective view.
Perspective
Orthographic
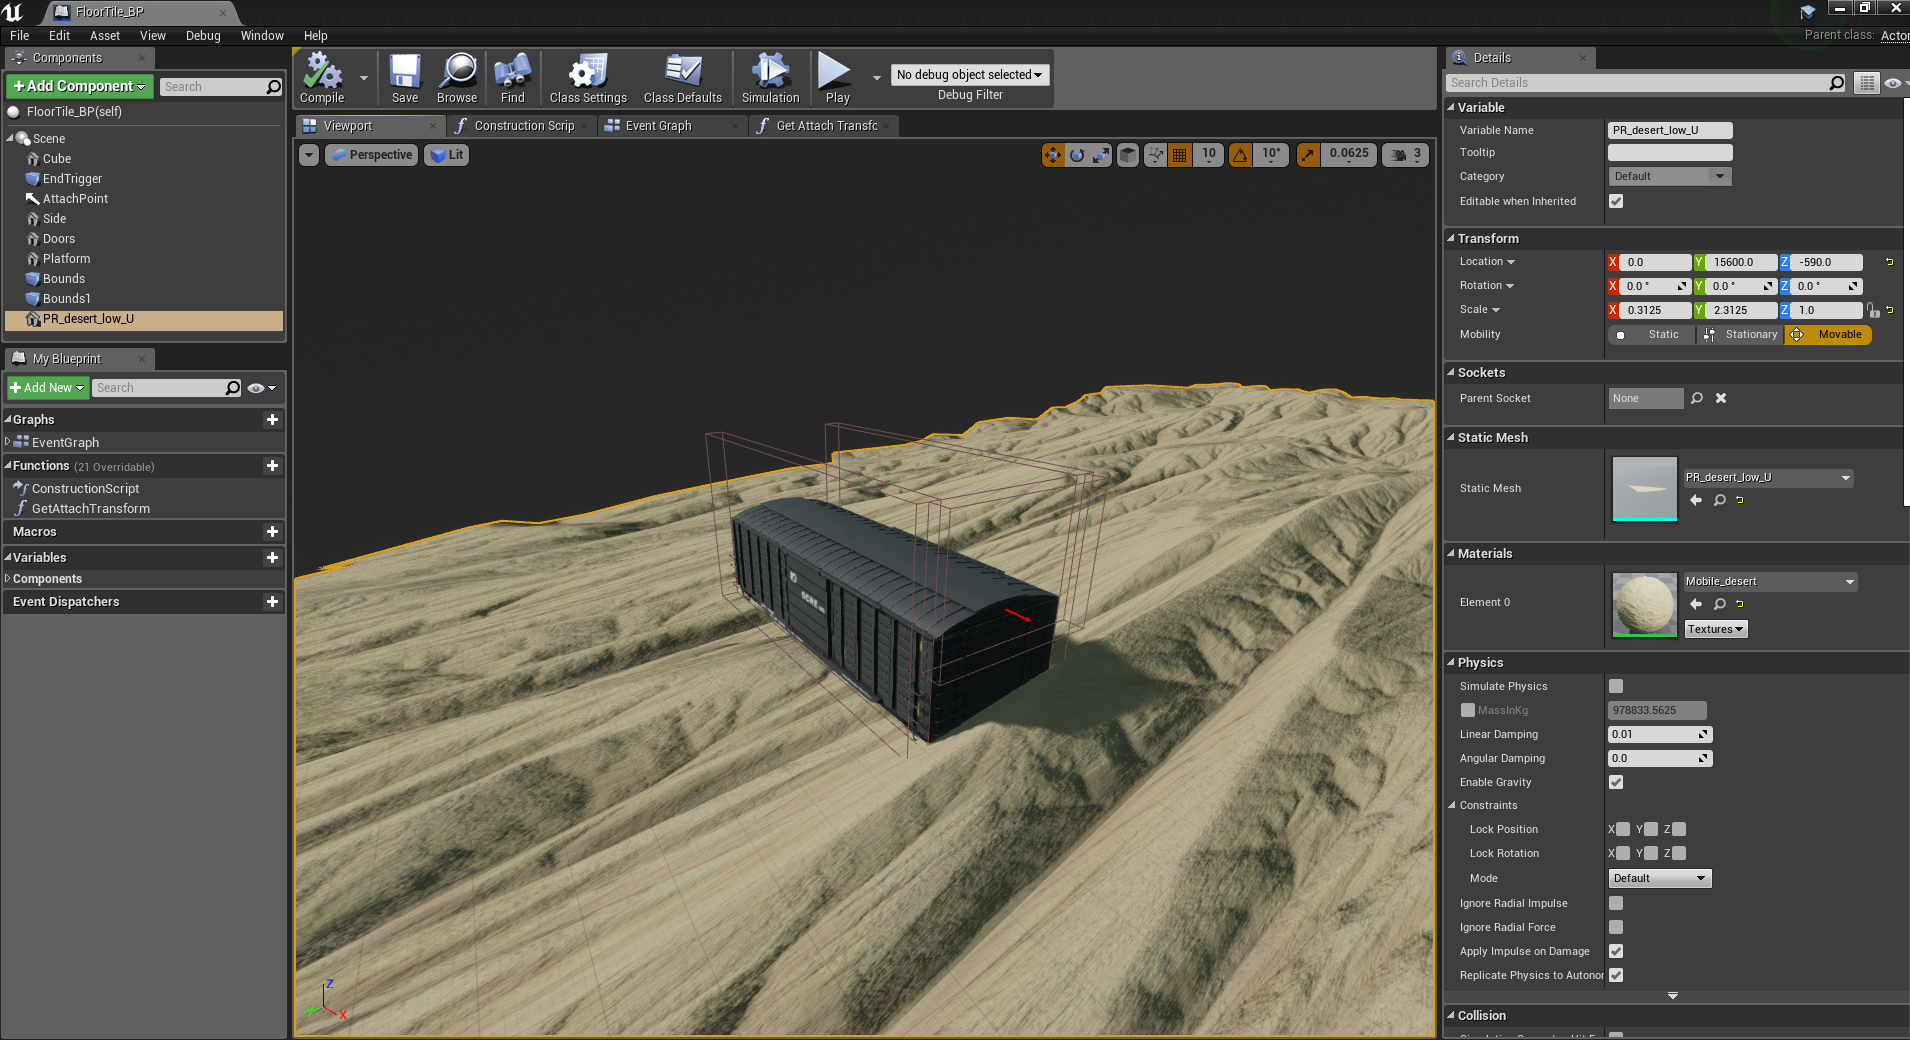
After doing this, I decided that I should get the floor tiles to spawn train carriages instead of a blank floor, so I began by looking through the different assets that I picked out, and trying out a few of them.
I ended up really liking the first choice of mine, I picked the Box Car asset, and it worked out really nicely in my game.
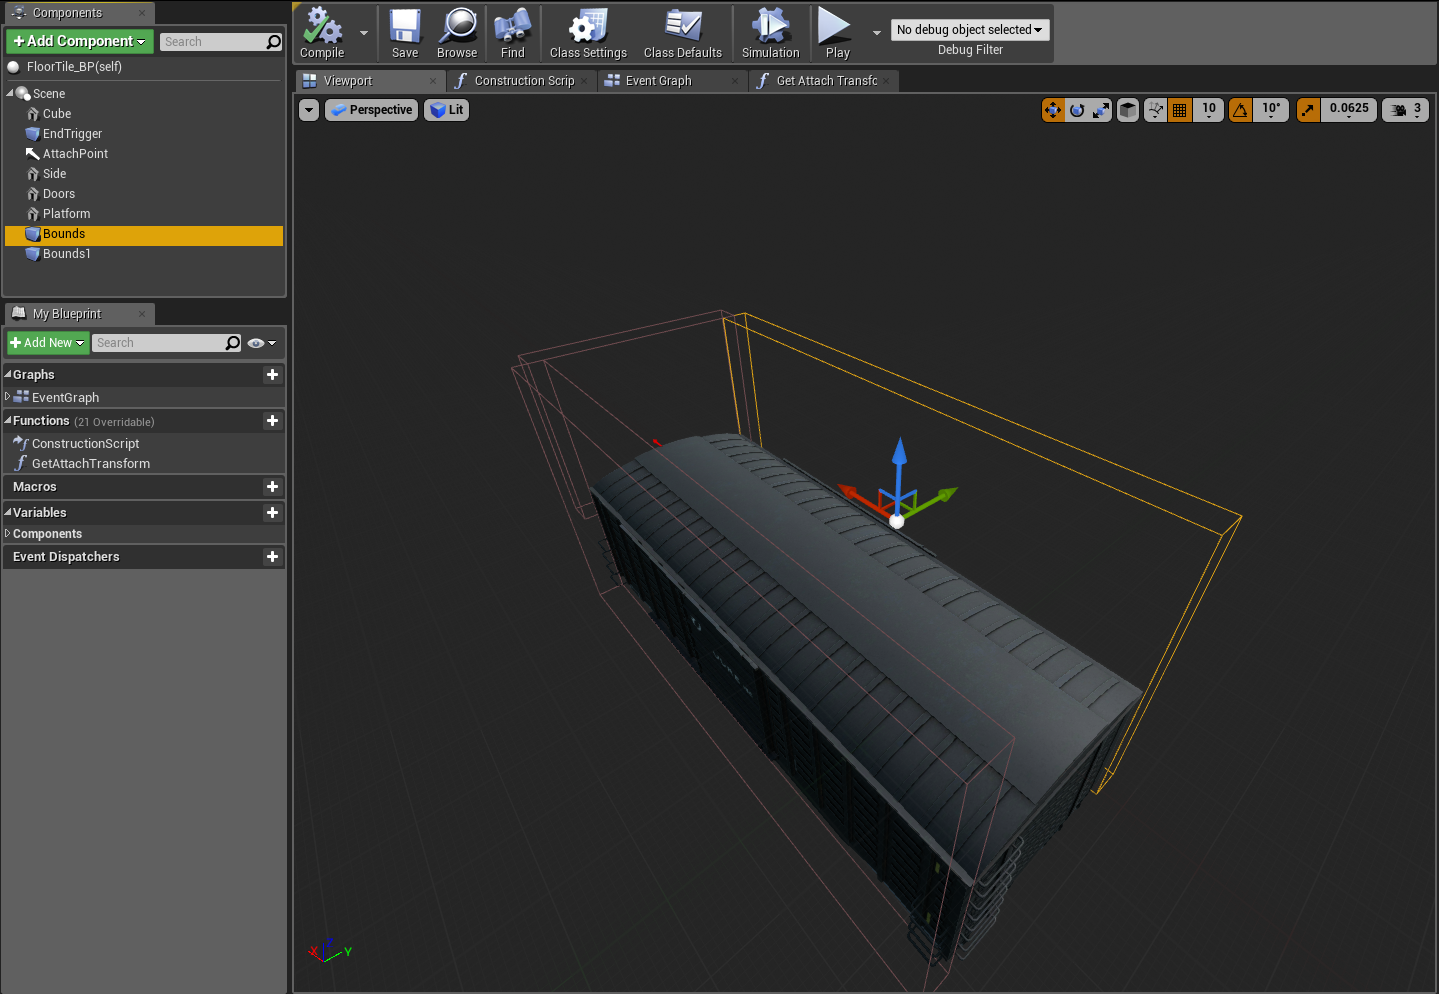 To make it so the player doesn’t walk off of the side, I added bounds to the side of the train walls, this is good because, firstly, the objectives would only spawn on the train, and if the player falls off and can’t get back on, they can basically avoid all of the obstacles, and get a really high score. Secondly, they wouldn’t be running over the end trigger if they’re in a dead spot of the train without colldiers, so they would be running but not spawning the next train carriage, meaning they will get to the end and fall off since the next event wouldn’t have been triggered.
Next, I’m working on the background and putting in a background, I didn’t want the background looking too realistic since this game is a low poly game but I didn’t want the background just being a flat plane, so I was experimenting with these backgrounds which I found on the Unreal Engine asset store.
Landscape Backgrounds (2016) by Gokhan Karadayi.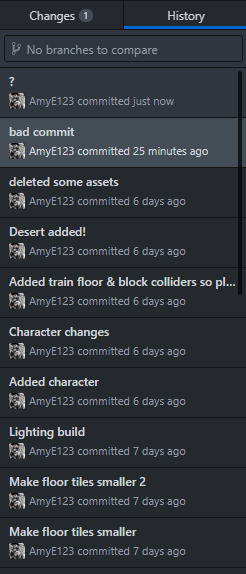 I knew when I inserted them, they were far too realistic to be put in my low poly game, but I really liked how they looked, so I played around with the material to see if I can achieve a softer, more cartoon look with the sand landscape.
The next time I opened up Unreal Engine, I had lost some of my data, something went wrong, I did get a pop up window about reverting the files, but I clicked no for some reason.
I figured out that the easiest way to fix this is to revert to my last commit on my Git repository, this is where I’m glad to know about how to use Git.  Using Git, I reverted back to one of my older builds, so I can continue from there, reverting back.
I done this on my home computer, since my home computer has TurtoiseGit, which is a Git GUI which I am more familiar with in comparison to GitHub Desktop.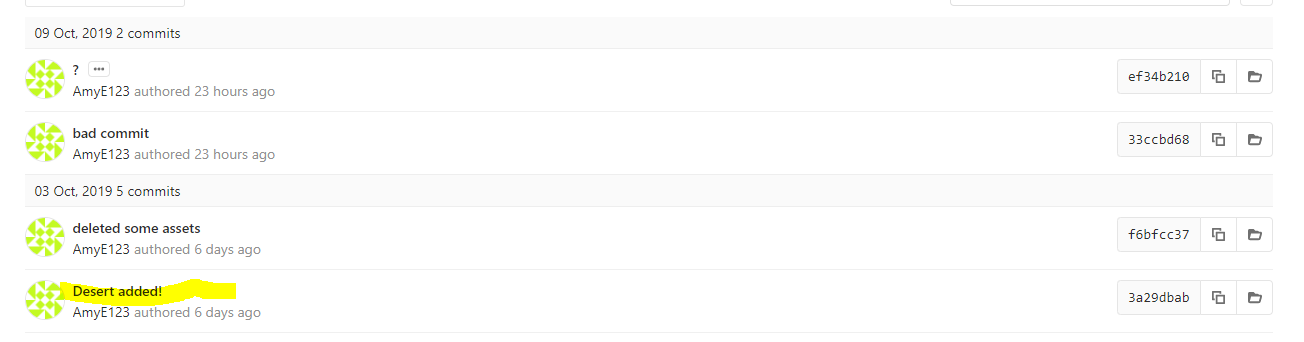
This is the commit which I wanted to revert back to, the other commits were faulty and messed up from me accidentally deleting too many assets, the commit highlighted is where everything all worked how it should do, so I began trying to revert on the GitLab website by clicking on the commit, and the 3 dots and pressing the revert button, this worked for the latest commit, but when I tried reverting the ‘Bad Commit’ it came up with this error – 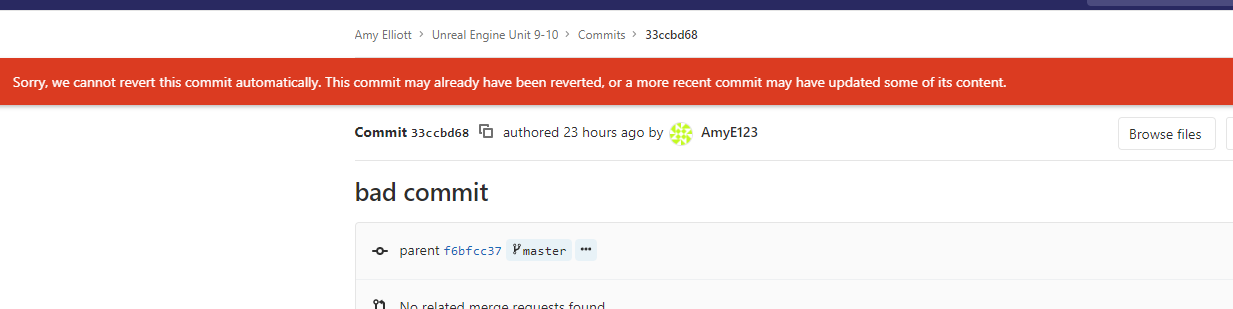 That is because the ‘Bad Commit’ and ‘?’ commit are pretty much the same,
 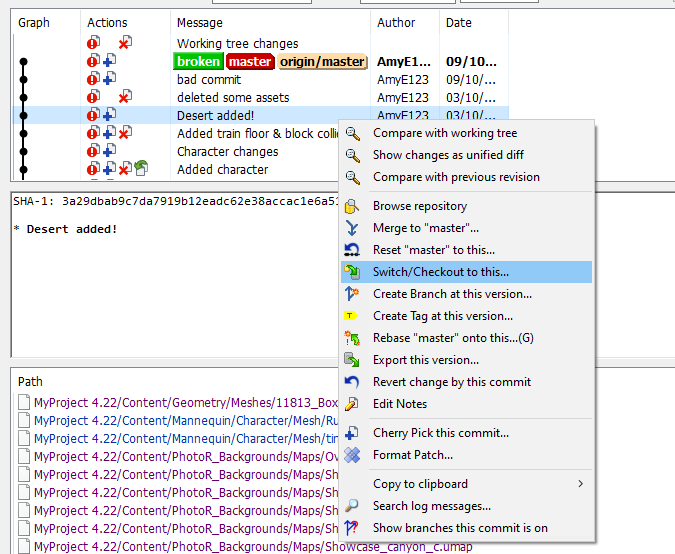 except a few files which aren’t important, so I decided this plan wouldn’t work so well, so I tried reverting using TurtoiseGit.
So, I opened the log and found the commit which I wanted to revert to, and I right clicked and checkout to that commit, and I unticked create new branch, since I wanted this to checkout in the master branch. Doing this brought up another error.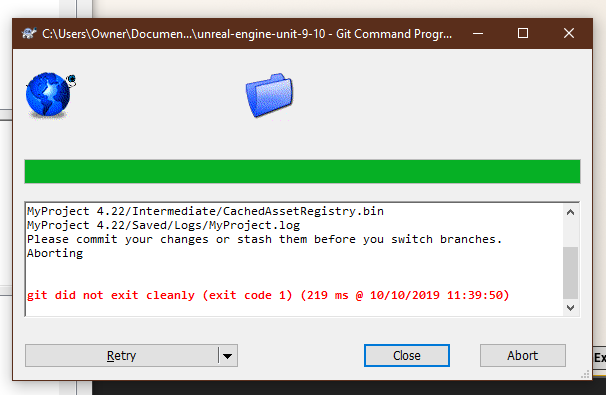
To get everything working, I had to revert some files since I didn’t want them.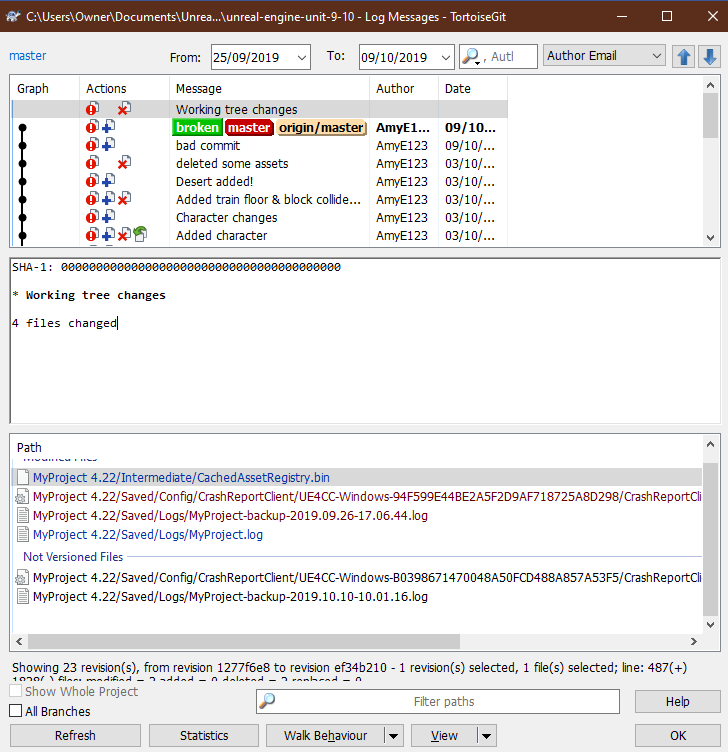
the four MyProject files in the paths Versioned Files were the files which I 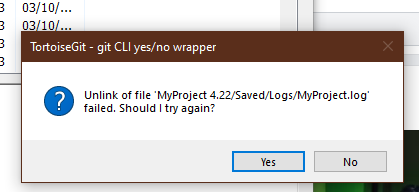 needed to revert, so I shift clicked all of them and right clicked and pressed Revert, and of course, this came up with another error. So I decided I need to try something else.
I right clicked my Unreal Engine file in my file manager and pressed Revert, and the same error popped up again.
So, I decided that maybe it would work if I deleted the file which is giving me errors (MyProject.442/Saved/Logs/MyProject.log) and then, I went back to checkout the commit which I wanted to go back to in the log, and I make sure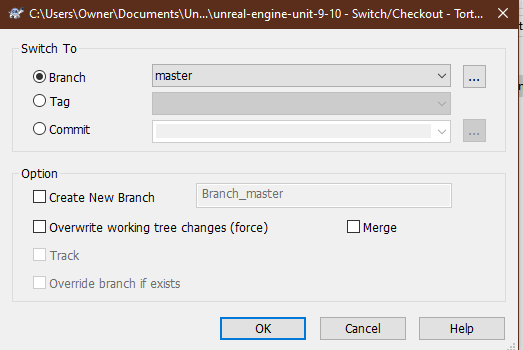 that I have create new branch unticked.
And it worked, my project was back to the commit which I wanted it at, and it was all working like it did before!
But I wasn’t done yet, so I copied the whole project file, and pasted it in another route, the reason is, I’m still exploring an out of date version, I 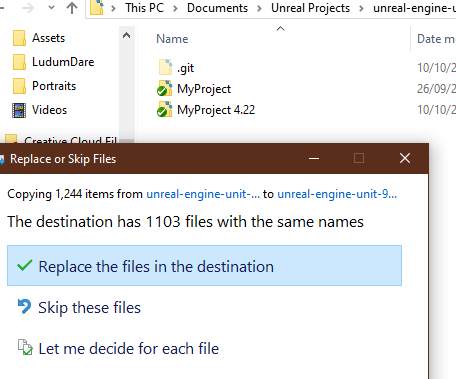 won’t be able to add new commits until I jump back up to date.
After I had copied it, I went back the the original file and went to the logs and checkout master again, so I was up to date, and then I pulled the original file for my project, to set it back to date.
After I’ve done that, I got my copied files and put them in the project folder all the files except .gitignore, replacing the old ones with the ones which work, and then I done a new commit. – And now it all works and it’s up to date with an older commit!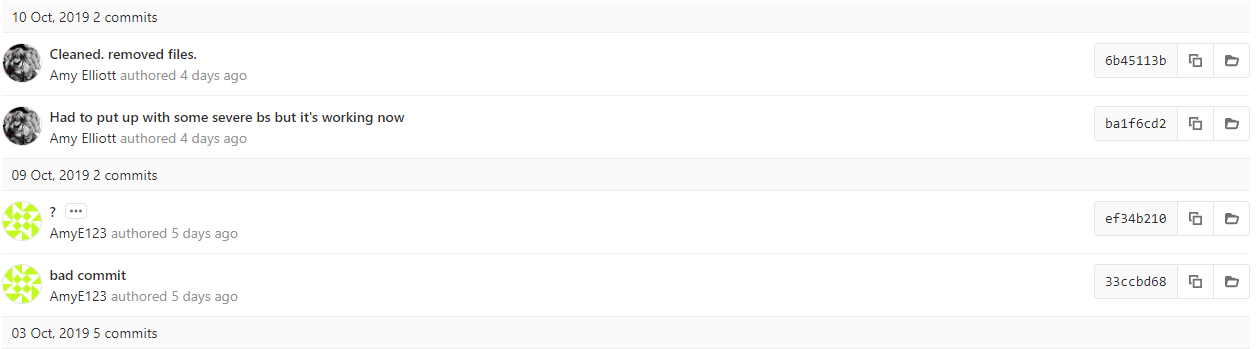
Back to the desert background, I used the realistic background and it turned out to be far too realistic for my low poly game.
But I tried it out anyway, I got the background, resized it, and turned off the collision, putting it just below the train on the floor tile, so the background would loop along with the train spawning.
Viewport
In the Game
I knew the desert looked too much for a low poly game, so I decided, to make it look like it would fit in I would have to go into the material editor and edit the material of the sand to look less realistic, but I liked the bumps and all the detail so I wanted to keep some of that in the game.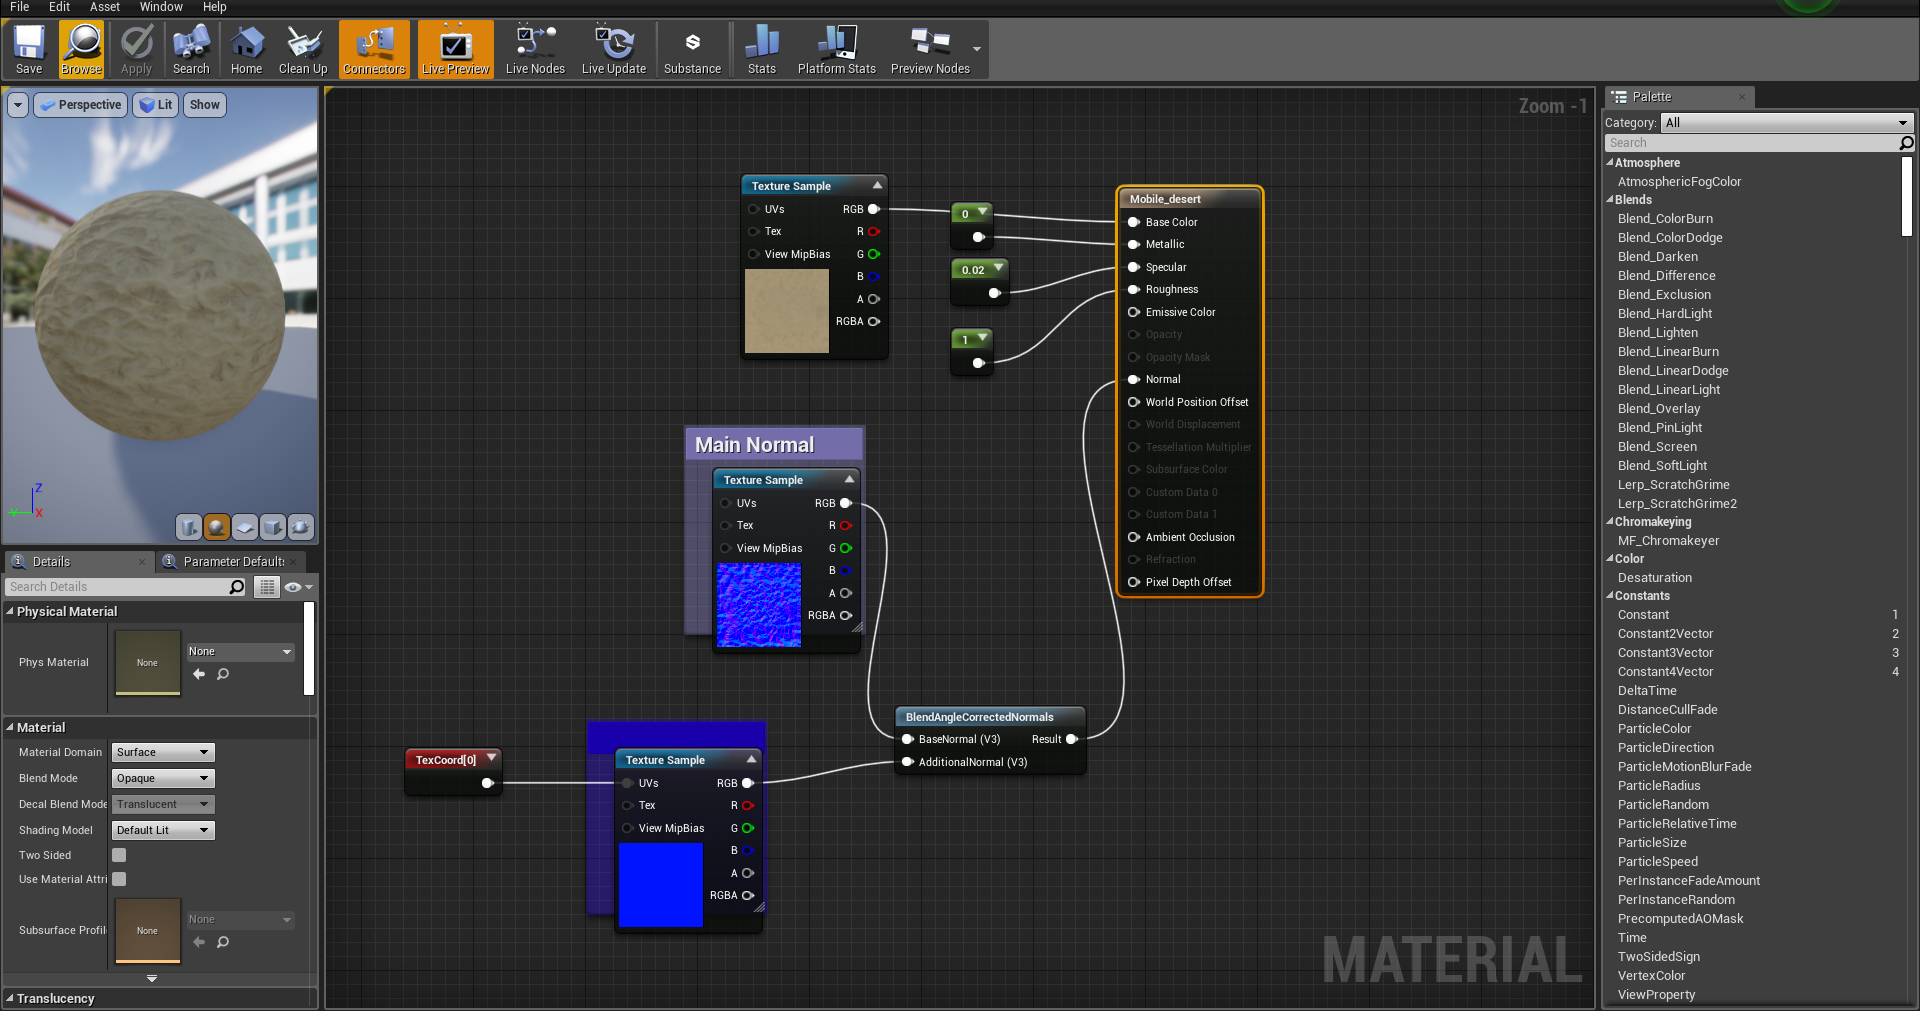 In here I was working with the materials on the sand, trying to make it look cartoony, I started with the normal map, changing the saturation of it so it would look slightly less detailed.
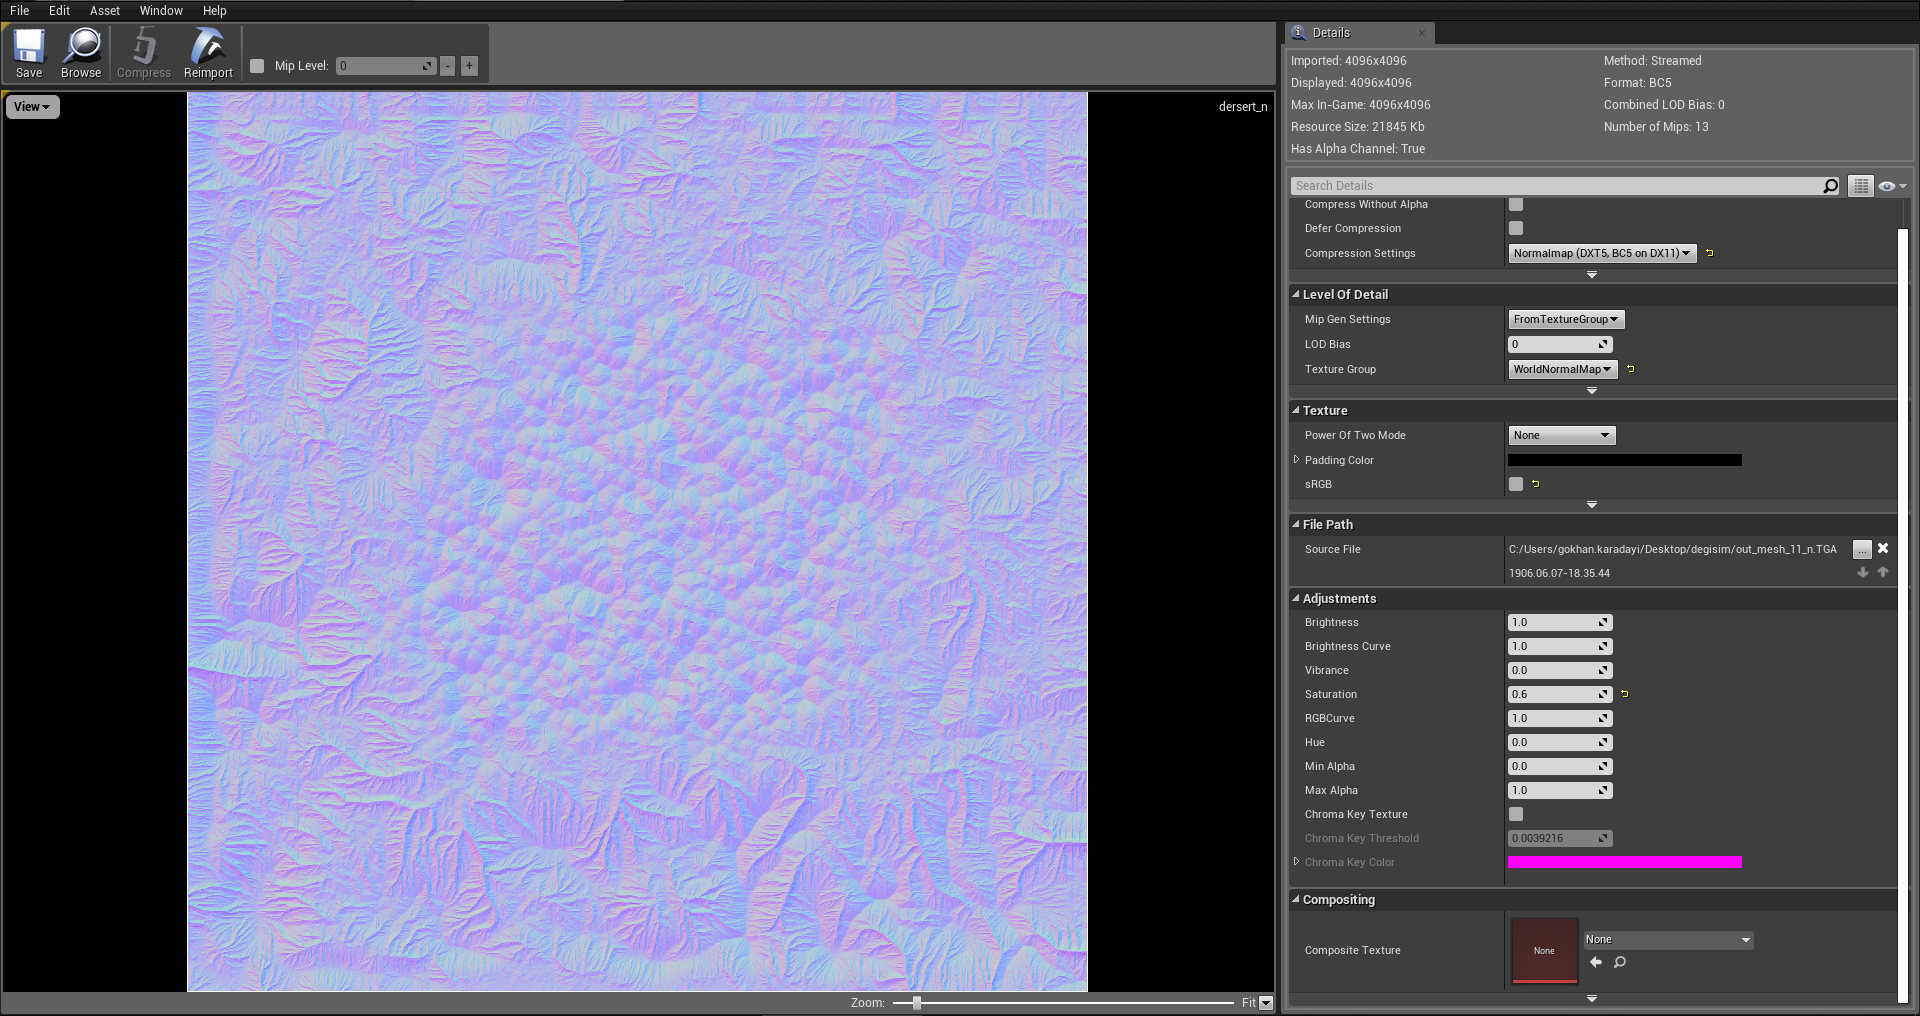
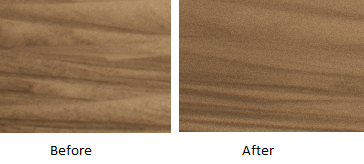
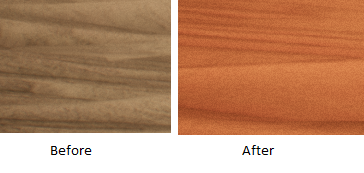
This is an image showing what the sand looked like before and after changing the normal, but I still feel like it needed more work, deserts which are in games which are child-friendly tend to look a lot more brighter.
Now I was working with the actual Base Texture of the sand, to make it a lighter colour, I increased the brightness and I changed the hue so the sand was more red, so it looked more like a deep desert, and doing this really helped make my game look more cartoony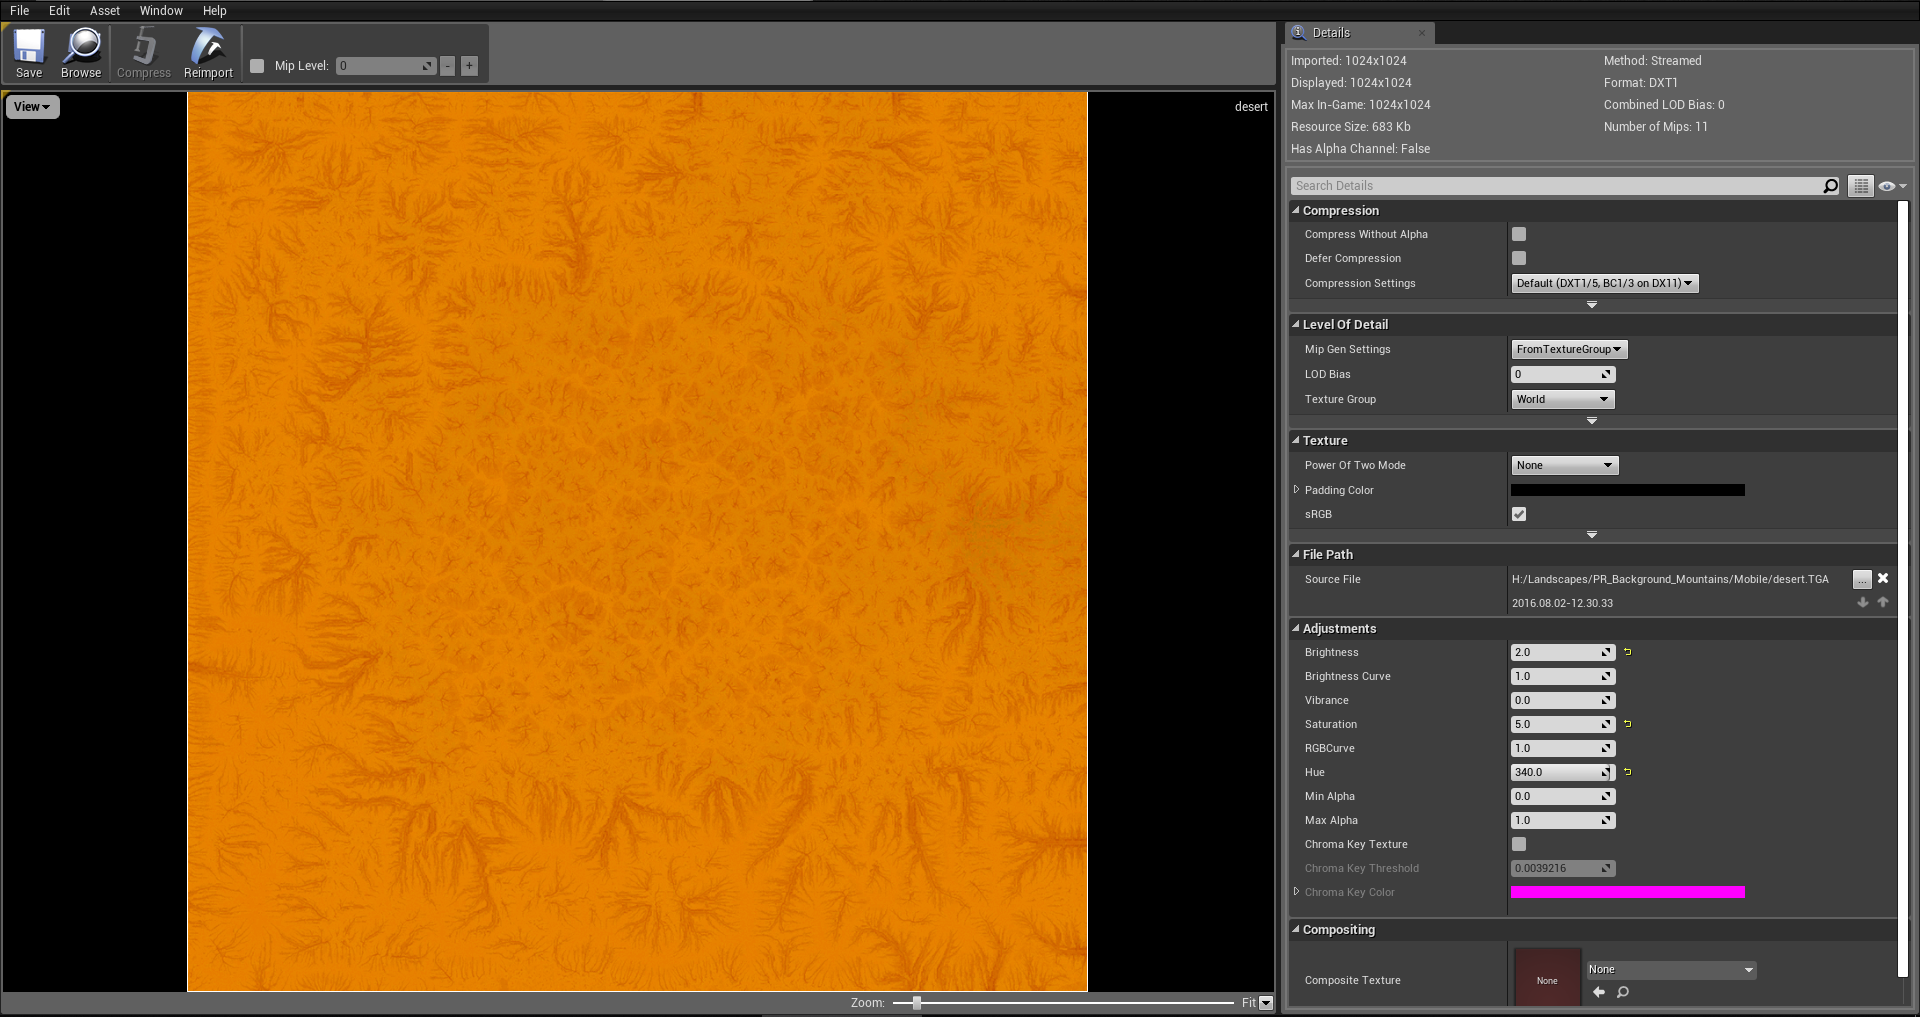
It looks very bright on the base colour, but once it was applied, I personally really like how it looks, and how it’s the same sort of colour as our players hat.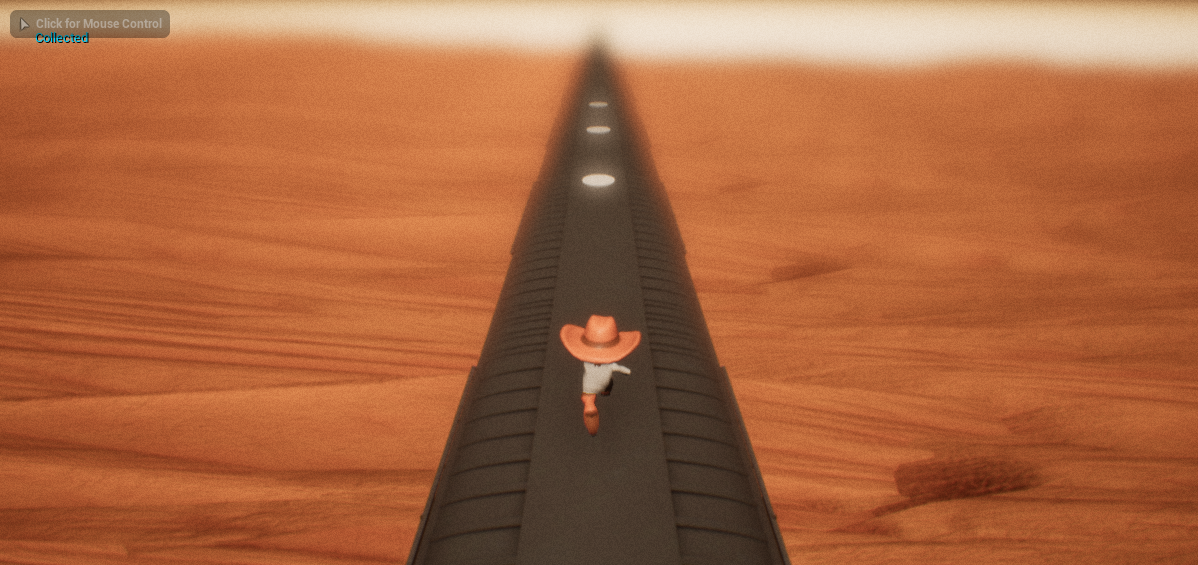
 Overall, I’m really happy with how the sand has turned out, and I think I’m going to keep it this colour since it really brightens the game.
It looks really gloomy and too realistic in the first picture, and it looks bright and much more appeasing to a younger audience in the after.
I decided that I should probably try and get the model for the collectibles in, I 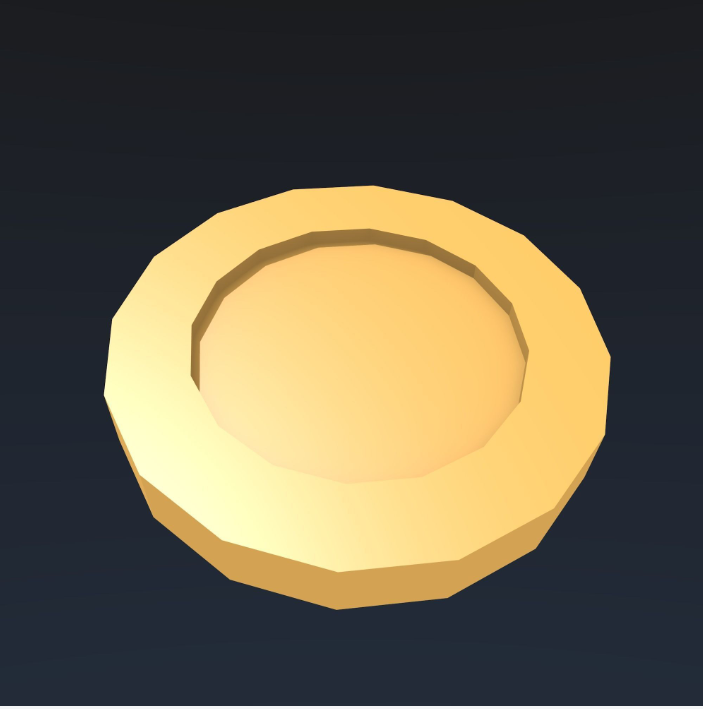 was originally going to use the Coin model which I have above, but I realized it was a .rar file, and we don’t have any way of extracting a .rar file on the college computers, so I tried the beer bottle and the bag of gold, on both of those, the materials weren’t loading, so I decided to look for another coin to use as a place holder for now, or perhaps I would like it enough to actually use it for the game, I found this Low Poly Gold Coin by Blob Fortress (2018)
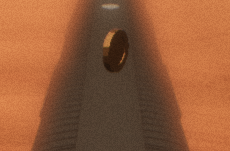
It looked very simple, but it’s perfect for what I need, and it looks great in the game, the only downside is it is a very dull colour, but that’s easy to change.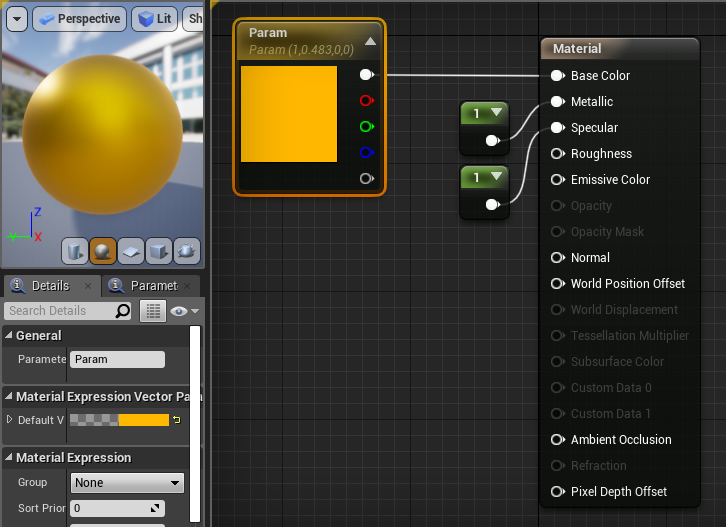
 The coin didn’t have any metallic or specular on it either, so I added some on myself, and adjusted the vibrance and saturation of the coins colour so it stood out more, but it still didn’t stand out enough.
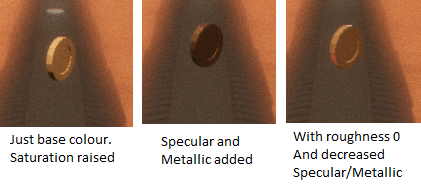
So, I messed around with different settings in the material editor and I finally found what I liked, and it’s the 3rd one across in the picture to the left. I like this because it looks the most realistic out of all the three, it’s not too dark or too light and it reflects the world around it, like a normal shiny coin would do.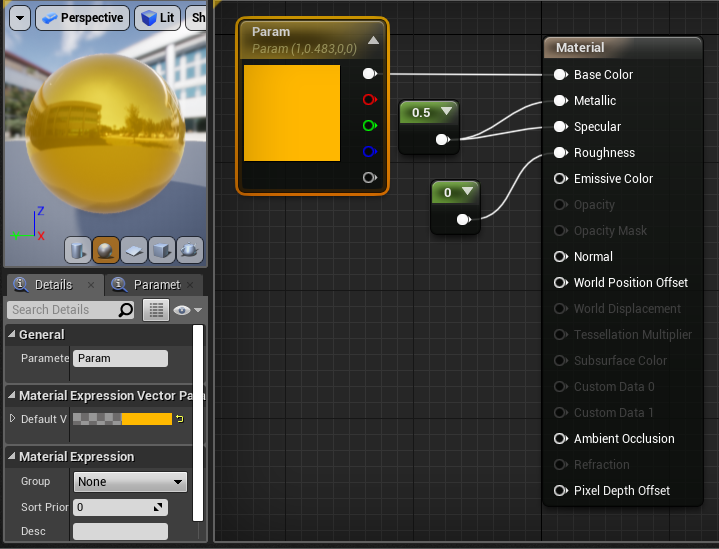
Now I’m working on getting the player to run in 3 different lanes on the train tracks, since most endless runner games have different paths which you can snap to. I used this Youtube Tutorial to help me.
So I made arrow components on the floor tile which is where the player can move between.
After doing that, I headed into the blueprints of my Player Character, I added a left and right input key on the blueprint.
After that I made a variable named lane, and I set the variable type to Integer, and I set the default value to 1, and then I made another variable called NewLane, keeping it an integer, keeping the default value as 0, but it doesn’t matter what this is, since the value would be changed and overridden.
And then I made a new variable, called Lane Y, since we are moving it on the Y axis, changing this to a Float, and then I changed this float to an array, by clicking on the side of where you select what type it is. And then I pressed the + value on the array to make 3 Values, and then I set the values to what locations I have the arrows at on the Y axis in Unreal engine, so that is 150, 0 and -150.
I then attached the left key, so when the player is clicking down on the left key we want to Set the New Lane, and then drag out from new lane and Clamp it, the clamp will stop it going past 2, we set the minimum to 0 and the max to 2, and then we drag out from value and attach it to an Integer + Integer node, then we hook the Lane variable into the original value of the node, and then add 1 to the next value of the node, since we are shifting to the left. And then we copy and paste all of that and attach it to the right key pressed, and then changed the value of the node to -1.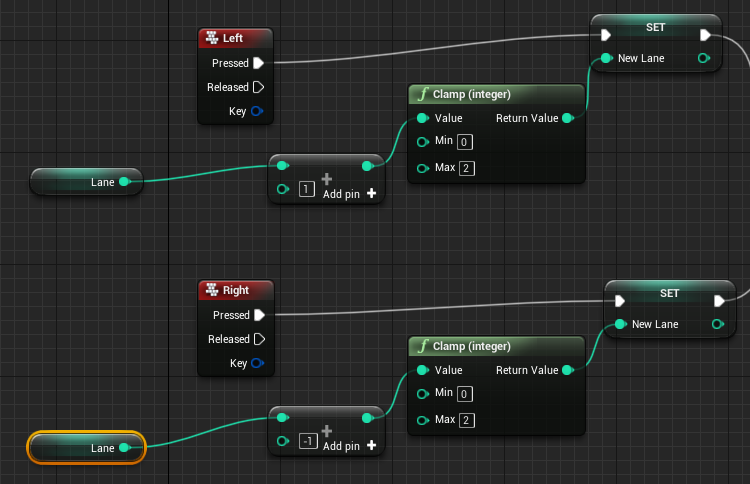 This is pretty much setting up the functionality of what lane we are going into, now we have to make the player character move into those lanes.
I’m are going to use a lerp, so the player Linerarly Interpolates to their location instead of snapping to it, using a lerp will make the game look a lot smoother.
I added a Timeline and named it Lerp, since that’s what it’s going to do, I then attached both the white arrows from both Set nodes into the Play from start pin in the timeline.
I headed into the timeline and made it a float which had a lifetime of 0.1, so that’s how long the lerp is going to last, we don’t want it too long, or else we are going to take forever to get to the next point, but we don’t want it to be too much faster or else it will look like we are snapping to the next point.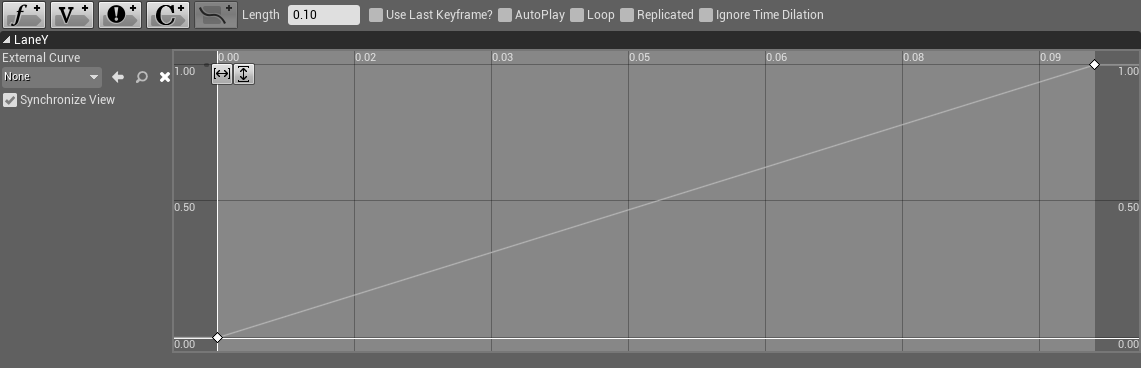
Then I drag out from Finished and I set Lane, and then drag out a reference to new lane and attach it to the lane pin.
And then I drag out from the update on the timeline and add the node SetActorLocation, this would set the character location to the current lane and Lerp it there.
In the location pin of the SetActorLocation, I split the pin.
And then I dragged out a reference to the Capsule Component and get world location from the capsule component and then I split those pins and attached the Return Value X and Z to the new location X and Z.
And then I added a float Lerp and hooked up the return value into the Y pin, and then on the lerp float I attached the alpha into the Lane Y on the Lerp Timeline, and then I dragged out the Set Lane Y array and dragged out from that array and attached a Get node, and hooked that up to the A pin on the Lerp, and then I got another reference of the Get node and hooked it up to the Lerp B pin.
After that I got a reference to the Lane variable and attached it to the first Get node which is attached to the A pin, and then I got a reference to a new lane and attached it to the other Get node, and then I also hooked up the other Get to the Lane Y array variable.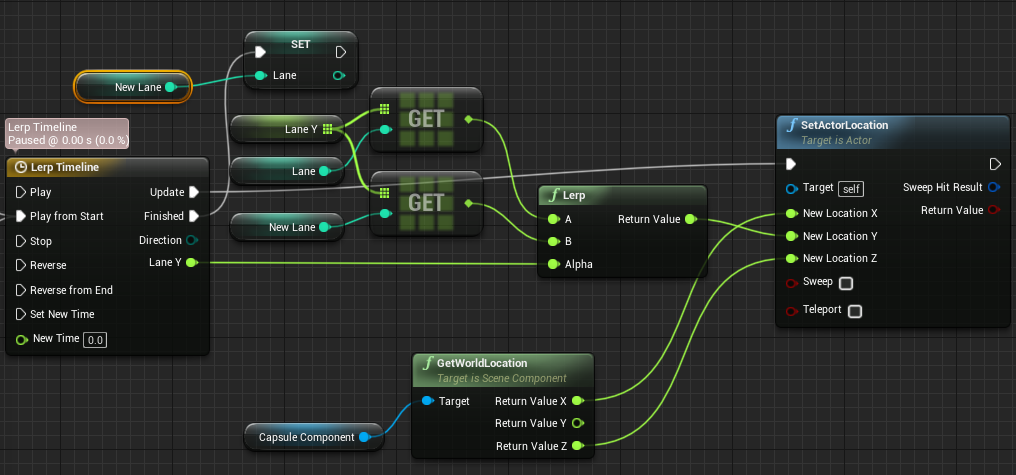
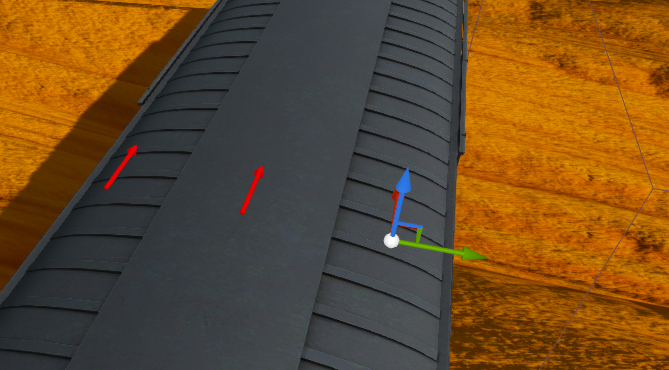
And this is my result
And now I’m working on getting a collidable blocker into my game, I began by finding something which the player would collide with, I began with trying the branches that I had above, but then I thought, that I can’t have them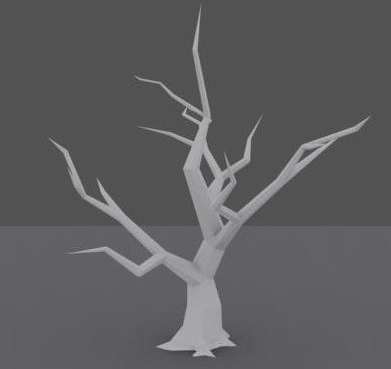 floating mid air, so I searched for a tree mesh to use, and I found one which I’ve looked at beforehand. Low Poly Tree (2011) stanloshka.
So I inserted this into my Unreal Project and gave it a material.
And then I made a blueprint called BP_Blocker, and I added the tree in as a static mesh and sized it up how I wanted it to be.
I then added a function into my Floor Tile blueprint called Spawn Obstacles, this function would spawn the obstacles (Obviously)
I began this blueprint by attaching the white pin to Switch on Int, and attached the selection to a Random Integer in Range, the minimum value of 0 and the Maximum value to 1, this means that the obstacle can either spawn or not.
I added a pin to the Switch on Int so I have 0 and 1, 1 being spawning and 0 being doing nothing, I left the 0 pin blank and attached the 1 pin to SpawnActor, and I selected the class BP_Blocker in the class section of the node, this would spawn the obstacle which is in the BP_Blocker, in this case it’s the tree.
And then I attached my Spawn Transform to GetWorldTransform node, attaching the return value to the spawn transform, and then just to test, I dragged the Middle arrow component into the target of Get World Transform.
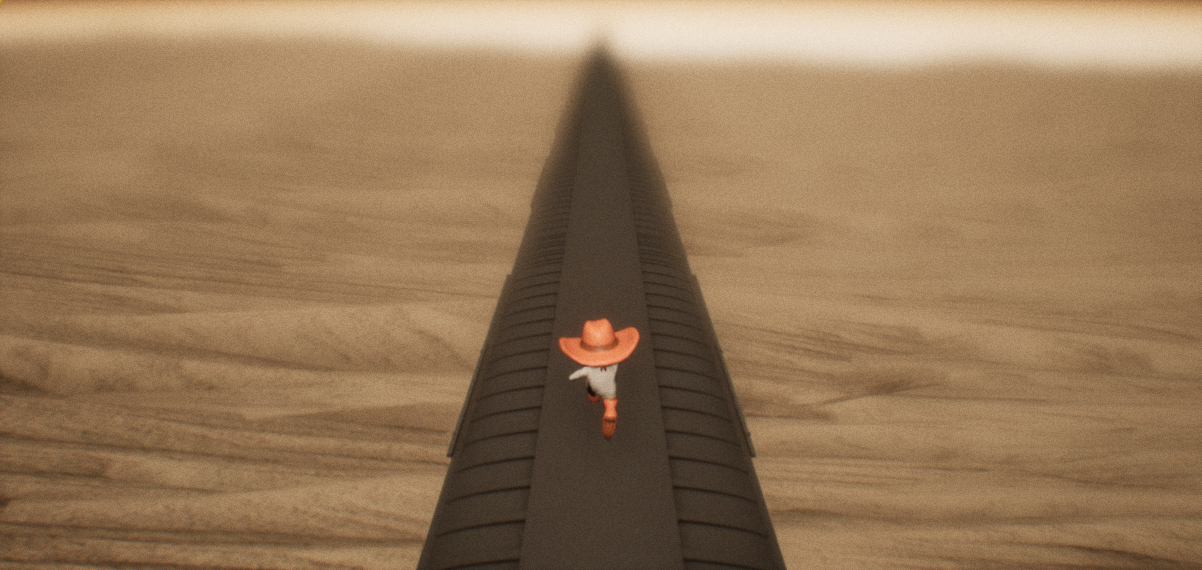
I quickly found out that having a tree as an obstacle looks really odd and not right.

At the beginning of the GIF you can see an issue with the camera, the reason why that is happening is because of the colliders, to make the camera work properly again, I just switched the collider presets to a custom collider and set it to these settings.
If I were to use any other collision presets I could come along the issue of the obstacle not spawning or the player going through the obstacle.
I knew I now needed to think of another obstacle which would be on top of a train, there isn’t much, nothing would really make sense, so I decided perhaps wooden crates and pipes would be a good idea.
So I found a nice Pipe Rail 3D Model (2019) by CallumFTW
To make the obstacle spawn in multiple lanes instead of just one, I duplicated the blueprints and attached them to the other 2 lanes.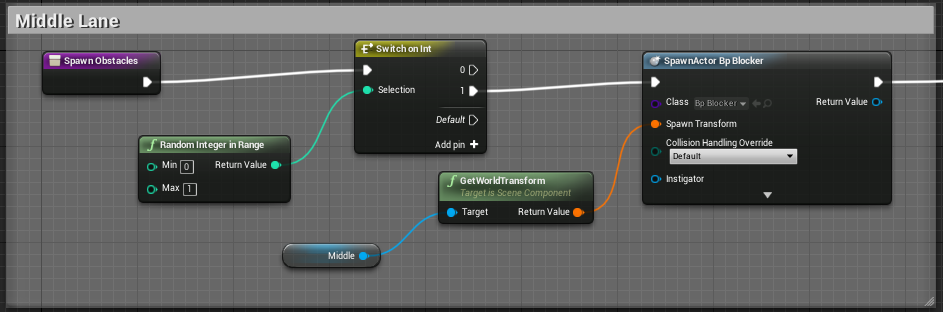
Next, I used the same script to add a bridge which randomly spawns in the map which you can go through, I made the bridge spawn in the middle and sized it up, duplicating the bridge and adding multiple bridges side by side.
I pretty much duplicated the blueprint and changed the class to BP_Bridge (The blueprint with my bridges in) I turned off the collision since the player wont come in any contact with the bridge at all.
I can also use this blueprint to add randomly generated scenery with cactus’s and trees and anything else that would be in the background of a desert.
